I’m planning on driving to a location for the total solar eclipse this year and thought I would post what sites I plan to use and those I found helpful to me in planning.
First, I’d say, if you are a procrastinator like me you will need to get your accommodations. Depending upon the area you are going to, more than likely all the accommodations in the direct center path area are already full. Look for areas that are on the outer edge of the total eclipse shadow zone. You might still be able to find something there, but expect to pay top dollar at this point. That is the situation I’m in, but I still plan to drive about an hour to get to the center of the shadow of the total eclipse.
Recommended Websites
To find locations that are within the shadow of the total eclipse, the best site I’ve found so far is.
Interactive Map from the greatamericaneclipse.com
By using this map, not only can you find a location within the total eclipse shadow, but you can see the length of time the total eclipse will be visible for that area. If like me, my accommodations are on the outer edge, you can see where you would need to drive to get more time within the shadow. For my case, where I’m staying it would only be in the shadow for a little over a minute. Where I plan to drive to it will be 2min 38sec.
This is what the interactive map looks like for the area I’m going to.
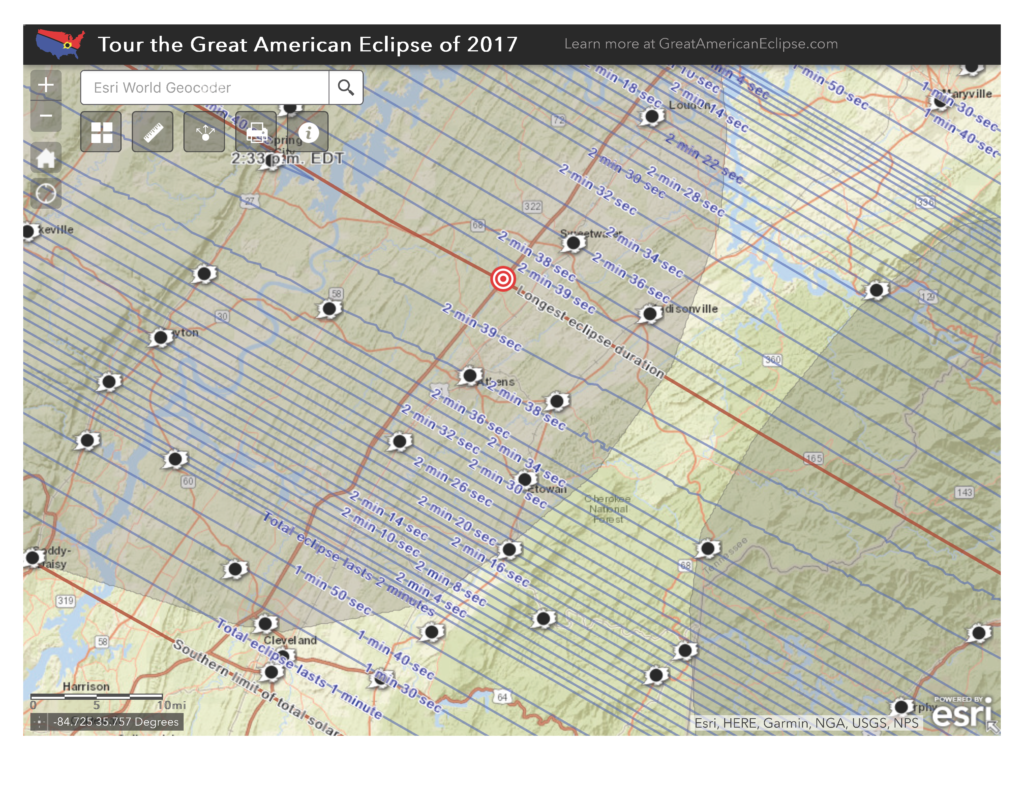
The biggest thing that I found helpful was the blue time lines. Due to terrain and partly due to the moon’s surface, the time lines to vary a little bit. Notice the 2min 38-second line gets a little squiggly as it goes over the mountains.
For an overview on the eclipse check out the NASA site at
eclipse2017.nasa.gov
Here you can get the all important Saftey tips, the Science behind the eclipse, and find out about some events planned. And more.
For the photographers out there, so far, the best site I’ve found for tips on how to photograph the eclipse is at
www.mreclipse.com
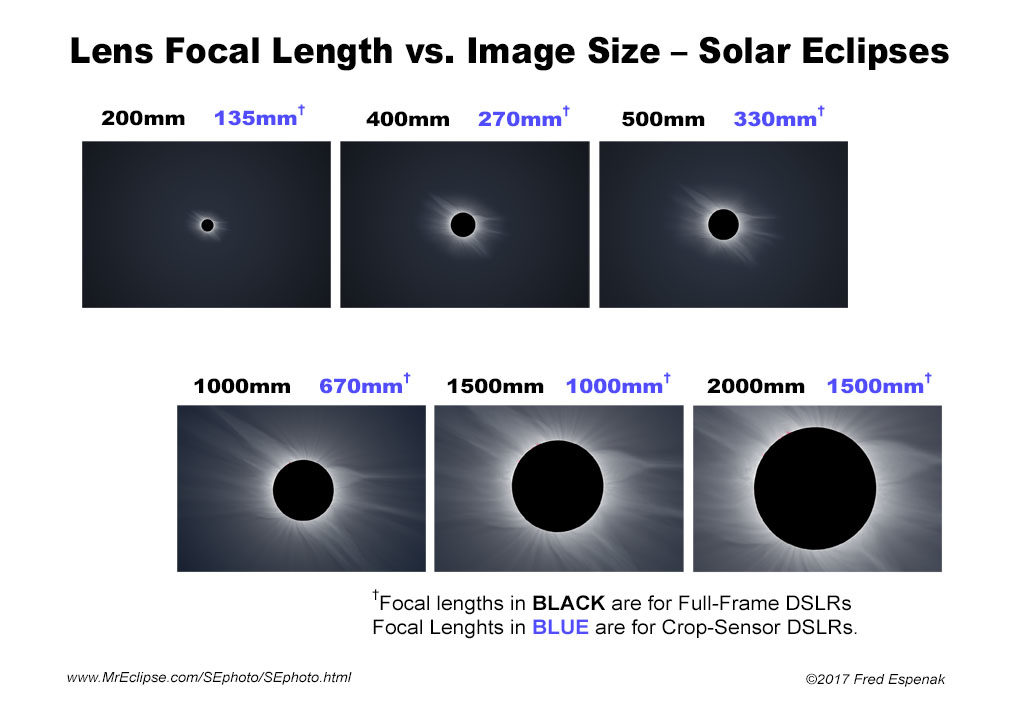
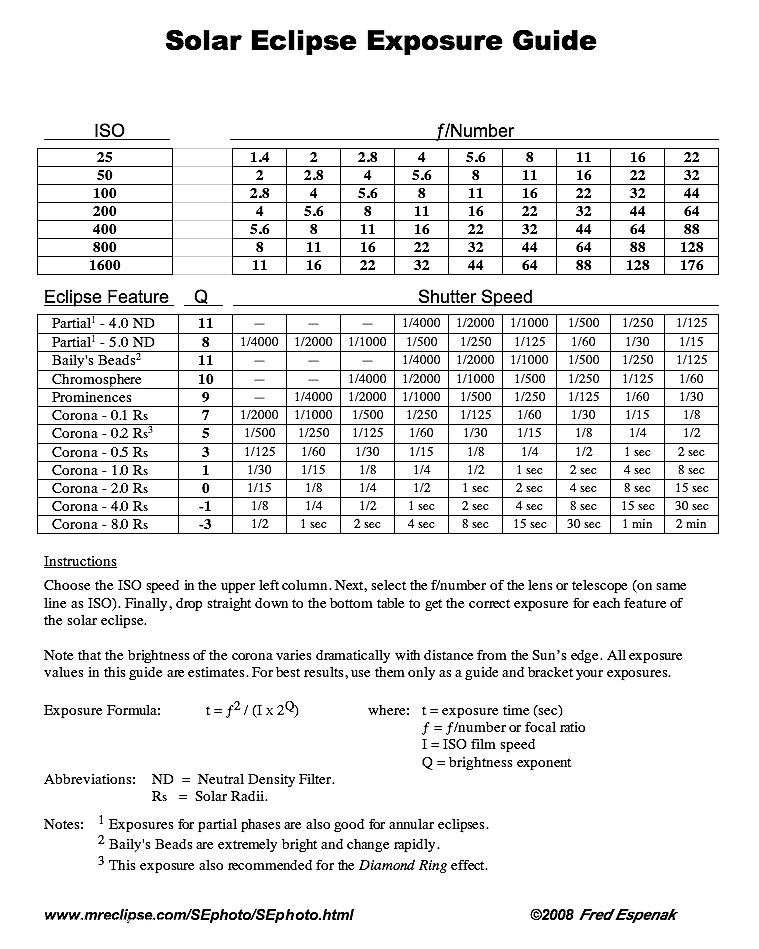
Two particular images I’ve found useful are
- The size guide showing what the sun would look like using a particular focal length lens shown here.
- The Exposure Guide:
both of these images can be found in full artcile context at
www.mreclipse.com/SEphoto/SEphoto.html
The equipment:
No matter what camera you have, you MUST get a special SOLAR rated filter. Dark ND filters will NOT protect your camera. A lot of the solar filters are sold out, but it is still possible to get some at your favorite photography website like Adorama.com.
You will also need eye protection. Again, your favorite photography site like Adorama.com should have them. I happened to get my from another site and they are the paper version with the special Solar Rated shield. You may look geeky, but you MUST protect your eyes. And I can’t stress enough, any other solution that does not meet the requirements of ISO 12312-2 for direct solar viewing should NOT be used. There are many products out there and you need to verify that they meet this standard in order for you to look directly at the Sun during this eclipse.
Please verify this for yourself, but it seems if you are in the area of direct shadow from the full eclipse when the moon fully covers the sun, this is the short period of time that you can view the sun with the naked eye. You must wait a few seconds (say 15 to be safe) after the moon covers the sun to make sure you are in full darkness. And you must make note of how long the full eclipse will be for your location as you will need to put your eye protection back on before the sun peeks out the other side. (again maybe 15 secs before it is predicted to reappear to be safe)
What to do before the big day
Now that you have your location planned out, your Solar Filter and Eye protection, it is time to practice.
If you don’t want to start right out with practicing on the sun, practice taking pictures of the moon. Try out the various size lenses you have if you have that type of camera to get an idea of how big the sun will be in the image for that size lens.
After practicing on the moon, go ahead and practice on the sun with your filter attached and your eyewear on. Remember for the cameras with direct view finders such as DSLR’s, even with the filter on do not look through the viewfinder. The filter on your camera is designed to protect your camera and does not have the protection needed for your eyes.
Practice, practice, practice.
You want to get all the bugs worked out of your workflow or plan especially if you are going to change lenses during the event. You don’t want to get to the big day and miss the shot because you were fumbling with your camera during the short total eclipse period.
The one thing you can’t test for that I know of is the full eclipse. That is where the above exposure sheet will come in handy. But make sure to review, highlight, or do what ever you need to do to make note of what settings you will need during that time.
Not everyone is going to be in the total eclipse area, but a big majority of the United States will get to see at least a partial eclipse. This is the first total eclipse over the United States in some time so you don’t want to miss it. You don’t have to stand out the entire time, but at least try to get out during the peak for your area.
Only slight plus on things is that if you totally mess up this time, take it as a learning experience for the next time a total solar eclipse comes to the United States in 2024.
And don’t forget while you’re taking pictures to stop and just take a moment and enjoy the experience. And have fun.
As soon as I get my own practice shots done, I’ll post them here so you may get an idea of what practice shots can look like.
