The weekend storm is now the largest single snowfall event on record for the Baltimore area. The only time we have had it worse was the back to back snow storms in 2010. What made it worse was that it was one right after the other, but still not the amount of snow we received this time.. Like many around us, I spent yesterday digging out for 6+ hours just to get my 100 feet of driveway clear and unbury the cars. We got lucky in that a neighbor’s son who had a plow on his truck cleared our spur of the road and another neighbor had already cleared the main private road out to the county road.
Thank goodness I bought a snow blower a few years back or I think I would still be out there and very sore instead of just a little sore and stiff. I’m still recovering from all the exercise today though with sore muscle that haven’t seen that much use in a while. Despite all the work it takes to clear it, it was a beautiful sight to see everything covered in snow there for a while.
The beauty of the snow
The scene outside out house before we got to clearing the road. Yes our road is buried in there between the stake and the pine trees. Now that things are cleared and all the snow is piled up it doesn’t look so pretty.
I was hoping to get another series of photos with the snow on the trees, but by the time we got things cleared out enough the snow had fallen off the trees. It was just way to deep for me to walk in before so I wasn’t able to get the entire tree line as I’ve done in the past like I had hoped to. Also, the snow was only on the south side of the trees this time. During the storm the high winds from the north kept the snow from sticking to the north side of the trees.
A tip when taking pictures of snow
I learned over time from various web sources that when you are photographing snow you should slightly overexpose your photo. The thinking behind it make sense to me in that all the snow glare is making your sensor think it is much brighter than it actually is and thus it is setting your f-stop higher that you want it to be, an Aperture of f11 instead of f8 for example. Since the f-stop is higher it is letting is less light and as a result you will get dull looking snow instead of the crisp white snow that you see. For the above picture I over exposed my photo by 1 f-stop. It is straight out of the camera untouched.
Here is a photo I took back during the 2010 storm before I figured out this tip. And you can see how dull it looks. Granted it was cloudy in this picture but it was still very bright outside at the time.
Trying out a new posting format that will include a photo header and a recent photo that I’ve taken. Figured this would be a perfect time to break out an old photo of Pine Trees in the Snow with the pending snow dump that is going to hit the Mid-Atlantic area I”m in this weekend.
I’ll admit I”m not a fan of winter, but if it is going to be cold I do like to see snow falling just as long as it doesn’t trap me at home for too long. Since I live on a private drive, the neighbors and I have to dig ourselves out and sometimes that can take all day.
I am looking forward a little to the first real snow of the season for our area. But when it is over and gone, I’ll be just fine until next winter. For now, enjoy a photo from a much warmer time this fall.
The Dome in the Fall
This is is the Johns Hopkins Hospital Dome and is the icon for the Johns Hopkins Hospital taken between some trees in the fall.
I know this isn’t strictly photography related, but nowadays aren’t we are all using our phones to take pictures and upload them to social media or share with friends and family. So I thought I would write about my experience in switching in an effort to save money. I’m all about the discount and saving as much money as I am photography on a very tight budget.
So this is just my commentary of StraightTalk wireless being a possible alternative to a more expensive plan from the other major wireless companies that are out there. I will not refer to carriers by name in this review as coverage will vary for each carrier in your area. Just note that according to StraightTalk their plans/phones work with the major US wireless carriers.
Specifically, I will be referring to the StraightTalk Bring Your Own Device option as I switched to StraightTalk with iPhones that I already had instead of purchasing new iPhones or one of StraightTalk’s Android options.
For years my family was not on a data plan with the carrier we were with as that was what I could afford. I had looked into switching to my carrier’s data plans but it would almost have doubled what was paying at the time and not something I could afford. I’m always looking at was to trim the budget and had been looking for another option for some time. I found myself picking up the StraightTalk, Net10, and other discount carrier brochures ever now and then and was always consider switching but paying the full cost for a phone was just not an option.
Initially I was hesitant to switch as I’m an Apple ecosystem with my personal devices and as such prefer the iPhone over Android for integration reasons. StraightTalk at the time had not yet supported iPhones on their system, so I stopped looking at them for awhile. StraightTalk had started to support iPhones, but I knew the cost of a new phone was out of my reach and that the carrier I would have been placed on I knew didn’t work well in my area. If you buy a new StraightTalk iPhone or one of their Android phones you will be placed on AT&T or T-Mobile as their phones are GSM system phones and these carriers are the GSM carriers in the US.
Toward the end of last year, I started looking at them again as I had gotten a hold of some used iPhones for a reasonable cost when someone I knew upgraded and saw that StraightTalk offered the Bring Your Own Device (byod) option.
I made sure the iPhones that I got ahold of had been on the carrier that my current phones were on and is my preferred carrier of choice. It was important to me as I wanted to stay on the same carrier I was on. Although StraightTalk says they do not guarantee which carrier you will be on, from my experience, if the phone you switch to StraightTalk was on a certain carrier that is the carrier you will end up on with StraightTalk.
I had obtained and iPhone 4 and and iPhone 5. The switch with the iPhone 5 went very smoothly and was the first phone I switched to StraightTalk. Being the cautious person I am for this switch I did not initial transfer my existing cell number to the iPhone 5 on StraightTalk but elected to get a new number. I purchased the StraightTalk byod Activation kit from Wal-Mart which has the network access code, Sim cards for various types of phones, and the initial 1 month of service. You can the byod activation kit direct from StraightTalk at a lower cost as they will only send you the Sim for your particular phone. The price of the kit will vary online and in Wal-Mart, but the plan was the $45/month for unlimited data of which the first 5gb of data is at LTE (high speed), then you are dropped to 2G speeds, but the important note is that it is unlimited data, granted some at slower speeds. This was a major concern to me as I had a daughter on the plan and I had the concern that a limited plan would not be enough and I would be stuck with overage charges on an already expensive plan.
I followed the instructions in the StraightTalk byod kit which had me go to the website, check that my iPhone 5 was compatible and then walked me through a series of steps where I had to enter the network access code and the plan code. And easy as that, I was a StraightTalk customer. First thing I did was go into the phone settings to see which carrier I was placed on and confirmed that it was the carrier I expected and that the phone had previously been on. After trying out the phone for a few weeks with the new phone number it was time to jump all the way and transfer an existing number to the phone.
I logged into my account and followed their instructions on how to transfer my existing StraightTalk and the instructions will vary depending upon which carrier you are coming from. For mine, they needed my account info, contact info, and for some reason the password to my account. Not sure why they needed this so I created a temp password for them, then changed it as soon as the phone was switch. If you want to switch your phone number when you activate the phone, they will walk you through the steps when you activate your phone.
Now when it came to switching the iPhone 4 I had a bit more trouble and encounter some of the issues which I’ve read in other reviews.
I verified that the phone was compatible on their website and with the chat tech support folks, but since I didn’t have a network access code yet I had to call customer service to buy one (I could have gone and purchased one at Wal-Mart, but I needed to activate the phone that night as my daughter was taking back to school with her the next morning). This is where I had my only issue with StraightTalk so far.
I had already verified that the phone was compatible on their website and with the chat tech support, but when I called customer service, after talking all my phone info and contact info I was promptly told it was not compatible and was hung up on. So I verified it was compatible on the website and again with chat tech support and call customer service back again. I had also done a little research on the StraightTalk website and found a page mentioning you could use an iPhone 4 CDMA phone with there server and that was the type of iPhone 4 I had. I called customer service and give the phone’s IMEI #, my contact info and such and again at the end was told it was not compatible. This is where I remembered the page I had found on their site that had said the iPhone 4 CDMA phone was compatible, but to use the MEID number instead. So I told the customer service agent to try that number and guess what, it was now compatible.
SO…. if you have an iPhone 4 phone give them the MEID number instead of the IMEI number even if they ask for the IMEI number and save you the hassle. You need to do this on the website as well when registering the phone. It is pretty much the same number except the IMEI number has one extra digit at the end.
I continued to the process to buy a network access code and they took info to set up the account. At this point I had been on the phone with the customer service agent for 40 minutes or so as I found I had to keep repeating information an even resorted to the D as in Delta method for spelling things and have them repeat it back to me. Since I had called late at night it was getting close to midnight at this time and that is when their customer service hours end. I had just purchased my network access code and was about to activate the phone when customer service agent very quickly said, I’ve been on the phone for xx minutes, I need to transfer you to my supervisor, but he is not available and was promptly hung up on right at midnight.
I was able to login into my account on the website and complete the activation and send the phone along with my daughter.
My recommendations/comments
If you are not the type of person who is comfortable with doing all the interaction with a company via their website, this may not be the company for you they are setup for you to use the website for everything.
If you need tech support, use the Chat Tech support on the website as I found this staff to be very knowledgeable and helpful. I will never call customer service again unless I absolutely have to. I’m pretty sure the customer service phone folks were not US based and that results in some communication issues.
If you can, contact the chat tech support during a week day as they seem to be very short staffed on the weekends and you may be waiting and hour or 2 for someone to respond and then only have a few minutes to notice they have responded and start your query or you will have to start over again. They will disconnect you if you do not respond within 3 minutes of the agent starting their chat.
As with all wireless services, the base price is not the total price. But for my experience the $45 plan is just shy of $50 with my states taxes and fees for wireless services, so just keep that in mind when you are comparing pricing.
You do have to get the plan renewed each month as it is a month to month plan, but you do have the option for auto renewal of which I’ve done and my card was charged the day before my plan was about to expire and renewed it for the next month.
Now that it is all said and done I now have 2 iPhones with unlimited data (granted some at a lower speed), voice, and text for a less that I was paying for just unlimited voice and text with my previous carrier. I’ve had no issues with my StraightTalk service as both phones are still on my previous carrier’s system.
You can find out all the details and make the switch on their website
My Review of Nowvel and a few tips of an iOS app for printing photo books on your iOS devices such as a iPhone, iPad, or iPod touch.
Through a recent promotion I was introduced to a iOS application that will take your iPhone, iPad, iPod touch photos, Facebook photos, or Instagram photos and create a 20 page photo book with up to 100 photos.
This is my review and experience with that product.
The product is currently only for iOS devices running version 8.0 or later.
I’ve used it on an iPhone and on an iPad. I’ve found it easier to use on the iPad just because things are larger and my eyesight is not what it use to be. It behaves the same on both devices. On both devices it is only in portrait view, which I can see on the iPhone, but I wish it would do landscape on the iPad.
Initially I found the app a little hard to use. Like a lot of apps these days there is no manual. Granted the younger generation that are use to mobile apps might would have picked it up a little faster than I. Once I figured the basics of adding, ordering, and editing photos I found the program very easy to use.
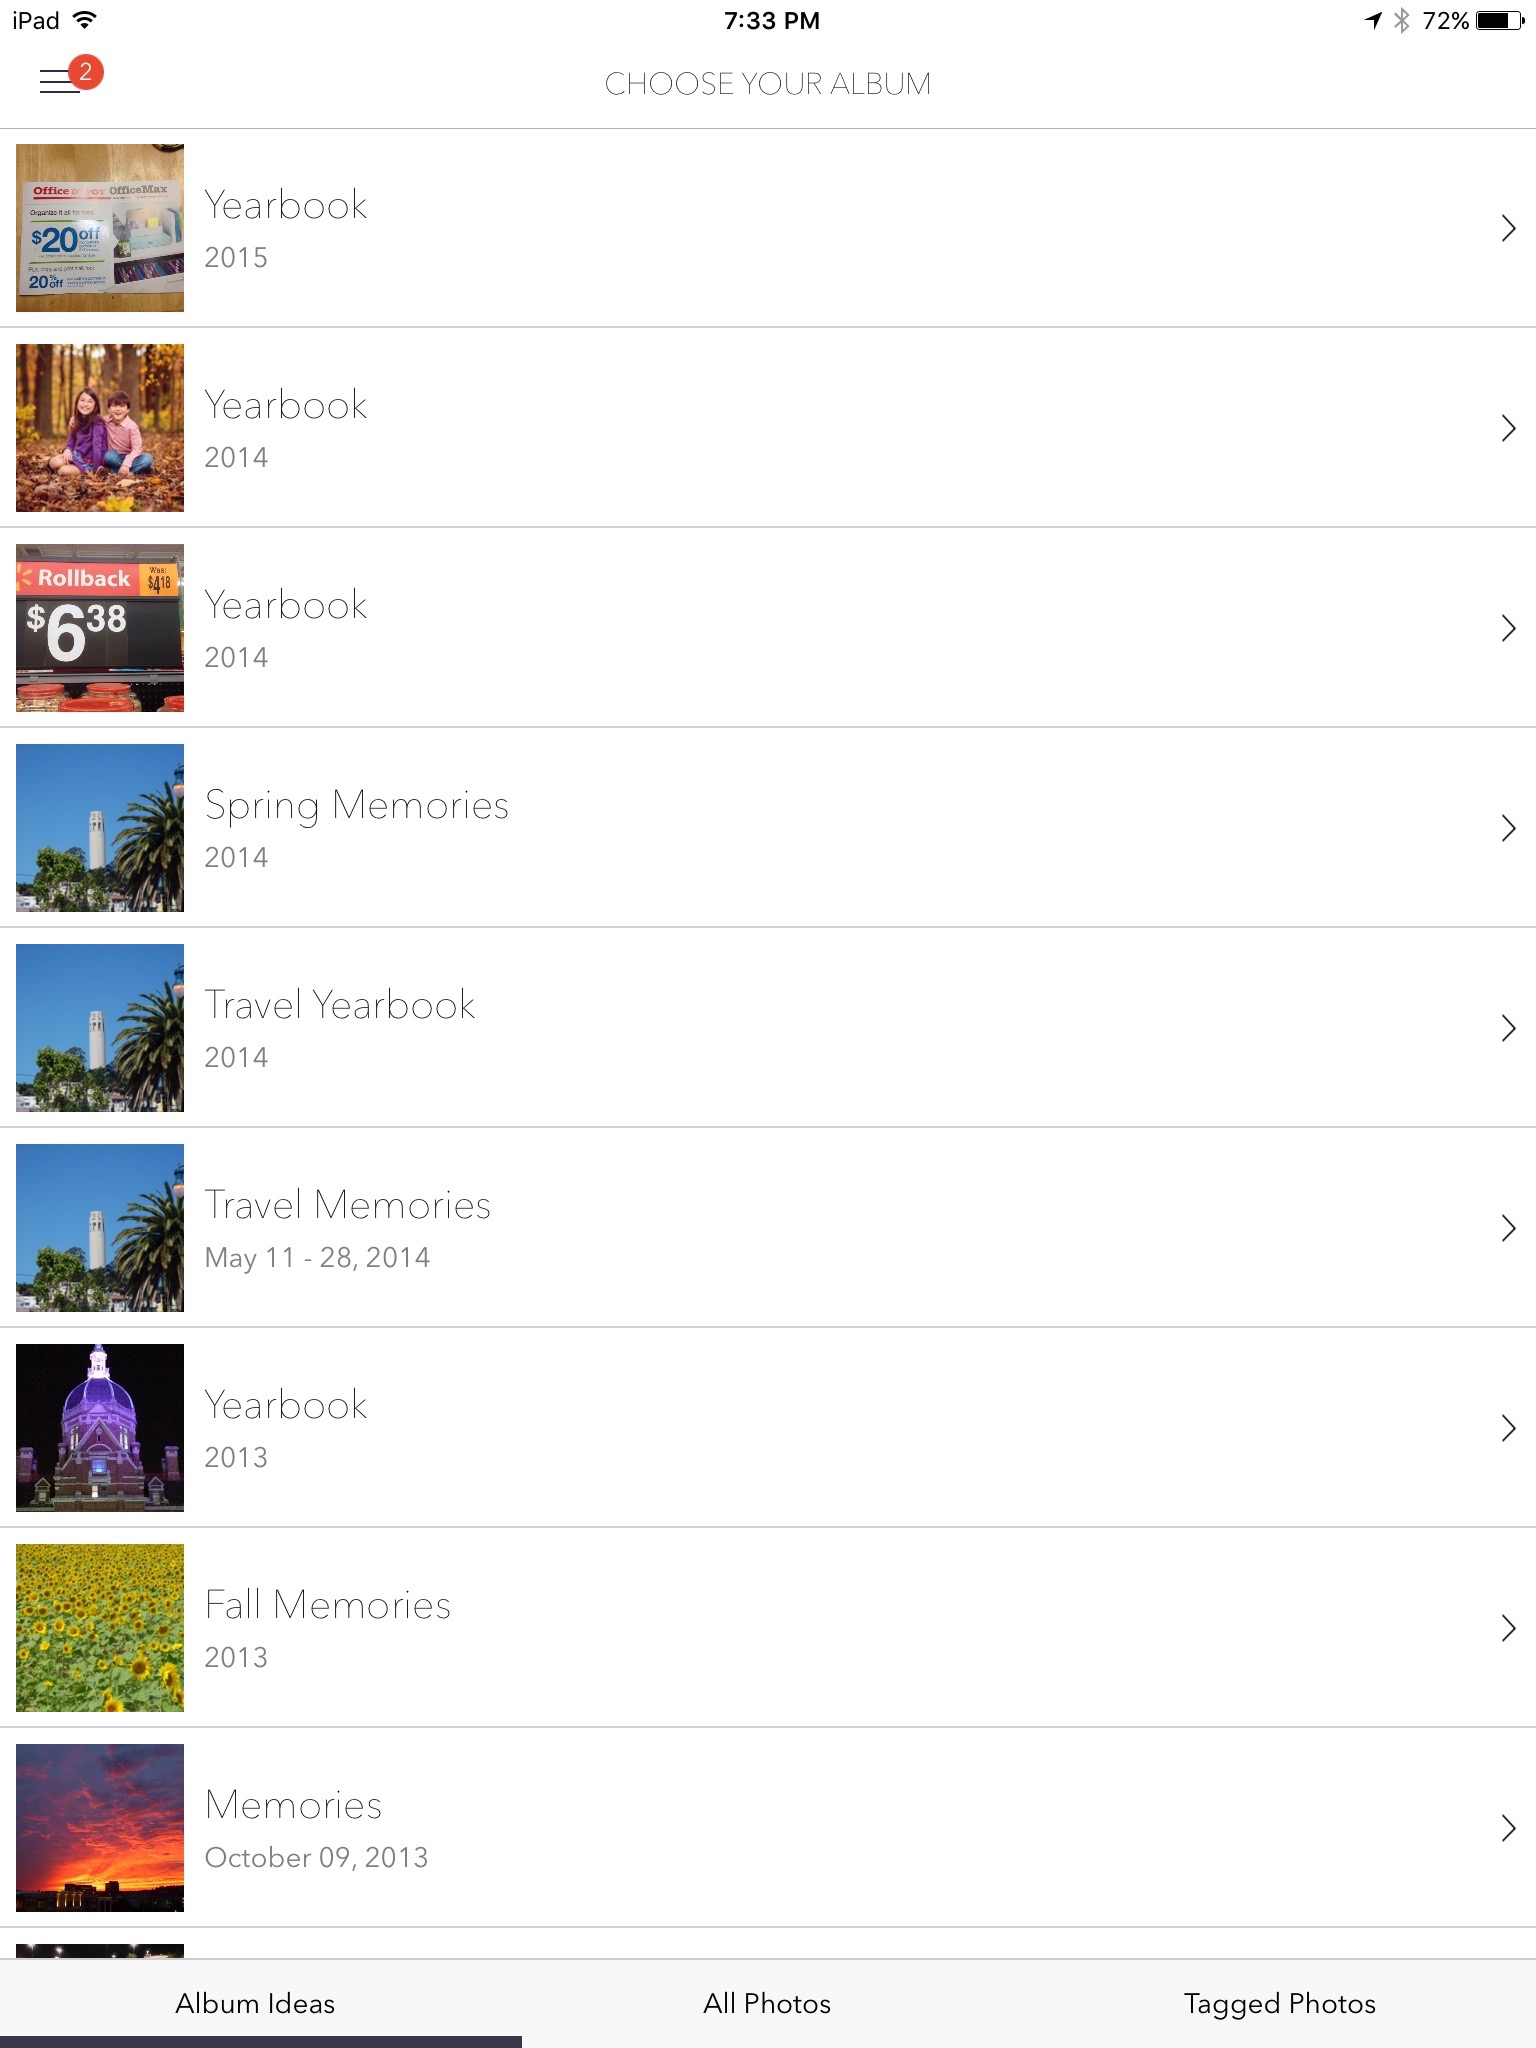
When you open the app you are sent to the Choose your Album of the Create a New Book menu.
You can either choose one of their automatically created albums on the Album ideas tab or choose All photos or Tagged Photos tabs to start creating a custom book from your photos.
Albums Ideas – If you select one of the albums that were created by Nowvel it will take you to the images that they selected for this album and put you on the “Our Picks* tab that shows the pictures the app has picked for the book. You can select the photos from this list or choose one of the other tabs of “Just Faces” or “All Photos”.
All Photos – You can select an album from your device, Facebook, or Instagram as the starting point for your new book. (Note you will see your iCloud Shared albums here, but do not use the those albums as a source as you either see no pictures available or it may show that most are too low of quality to print. There is a solution if these albums contain the photos you want to use and I give the steps below)
Tagged Photos – Shows photos that are tagged on your social media sites
Now how do you use photos that are in one of your shared iCloud albums and use it in Nowvel. Here are the steps I took
Open the Photos app on your device
Select the shared album that has the photo you want to use and open it to see the photos in the album
Click “Select” at the top and tap each image out of this album you want to use. If you want to use them all, choose “Select All” at the top
When you are done selecting the images, click the “Share” icon on the top left
Click “Save Image” to have the selected images saved to the local devices camera roll.
Open Nowvel if not already open and on the Choose Your Album page (on the Create a New Book section)
Select the All Photos tab at the bottom and choose your Camera Roll Album
You can now select the images you just saved to create your new Nowvel photo Book
If you have photos on your computer or took some with another device that you want to get into your Nowvel book and you are not using the iCloud Photo Library, just create a shared album in Photos on your computer and that shared album should show up on your device. Then use the method above to import them into your camera roll so you can use them in Nowvel. If you have enough iCloud storage and have the iCloud Photo Library turned on for all your devices then the creating of a shared library is not necessary as all your photos will already be on your device as part of that service. In my case, I do not have the iCloud Photo Library turned on as I have way more photos than my storage limit.
Once you select your images they are placed in your photo book in what I believe is chronological order by date/time and a layout is chosen for each page and you will be shown the current cover for your book. The number of images placed on each page will depend upon how many you selected, but you do need to have at least 20 photos selected before it will let you create your new book. Don’t panic if you don’t like the cover layout or any page layout as you can easily edit the book, just click the Edit Book on the top right.
You have 20 cover designs to choose from at the time of this writing and they seem to be adding more all the time. Most have some customizable text boxes on the front and back covers along with varying number of photos to be shown depending upon the layout chosen.
For each page you can Shuffle Collage to change the way the image or images are laid out on the page. You can easily add and remove images from a page, rearrange where they are located, and add text to the page. Just tap the image to edit it or remove it. Any removed image will be put down in a little bar at the bottom of the page so it is available to put back or be placed on another page. Tap, hold and drag an image to move it to a different panel on the collage. Each image can be edited by cropping it to fit the collage panel, or enhanced the image a little, or have a filter applied to the image, or any combination there of. To add text to the page, click the Add Text button at the bottom, type your text, and click done. The text will be placed in the middle of the page. You can now change the color from White to Black, Change the Alignment, or change the font. Tapping each button will cycle through the options for that button, just like the Shuffle Collage does for the images.
I will note that if you add an image, remove an image, or Shuffle the Collage you will need to check any image that you had adjusted the cropping for as it would have been reset and you will have to redo your crop setting.
Once you have the layouts done, you can reorder the page order if you wish. When you are done editing, just click done in the top left or View My Photobook at the bottom.
Now you are ready to order your book. Just click Buy Book at the bottom of the page to get to the in-app ordering page where you will see your coin balance applied, choose the number of books you want ordered, select if this is a gift, enter shipping information, and enter payment information.
You can also Share your Photobook with Facebook, Twitter, Email, iMessage, or other service. You have the option to have your book featured on Nowvel’s Inspiration Gallery and make it available for others to buy. If they do, you earn a $1 coin for ever purchase.
The Nowvel Menu
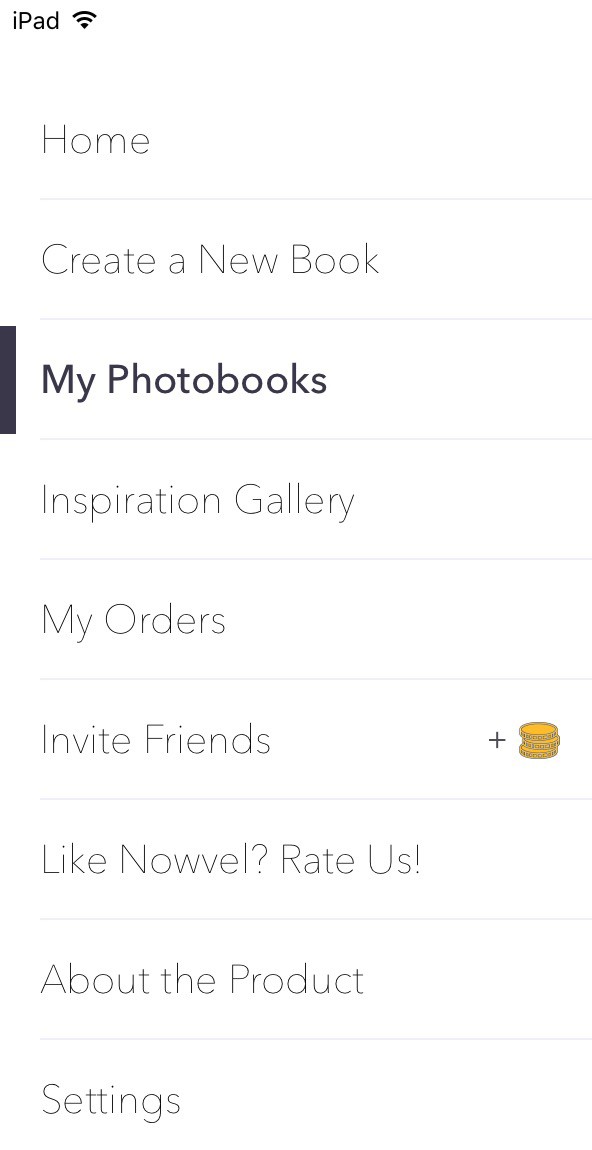
You can reach the main menu of the program by clicking the menu button of three horizontal bars on the tops left
The menu consists of the following options
Whats in each section of the menu
Home – Here you can quickly see your coin total and have access to the basic menu options of Create a book, View my books, and see their inspiration Gallery
Create a New Book – Here you will see
Nowvel’s list of Album Ideas that were automatically created based upon your photos. So far it looks like they have done a pretty good job on my photos of grouping them by event or time period.
All Photos is where you can select up to 100 photos for your custom book from your device albums (does show your iCloud Shared Albums here, but as I mentioned above you only want to select photos from the Camera Roll or Albums created on your iOS device), Facebook, or Instagram.
Tagged photos from Facebook, or Instagram.
My Photobooks
Photo books you have created or selected from the Album Ideas list.
A “Nowvel for Dummies” which describe the features of their books
Inspiration Gallery
Where you can see Featured Books created by other Nowvel users
My Orders
Any order you have placed will show here along with the Order Date, Order Number, and Status.
You can also Track a Package (Once your book has shipped) and Re-order a Book the book easily from this page.
Invite Friends
Here you can invite friends from Facebook or Twitter and email or SMS a Friend.
Your friend will get $5 off their first book and for each book they buy, you receive a $5 credit.
Like Nowvel? Rate Us!
Takes you to the App Store so you can leave a review or rate the app
About the Product
A brief description of their product
Settings
You can enter any Coin Codes you receive here to have the coins added to this device.
Shows what services you have connected for sources of your photos, Camera Roll, Facebook, or Instagram.
Shows if you have enabled Notifications
A Contact option that automatically creates an email to their support address that will show your devices unique code. This is how they know you and this code is different for each device, hence each device being treated as a different account.
The privacy and terms of use.
And icons to follow Nowvel on various social media sites.
Coins – What are they and how do you get them and use them.
Coins are a way of paying for all or part of your Photo Book. There doesn’t seem to be a limit on how many you may earn. You can view your balance on the Home page.
You can earn coins by doing various tasks such as connecting Nowvel to your Facebook and Instagram accounts, Inviting friends to use Nowvel, and you may receive notifications on other ways to earn more coins.
You can use your coin balance to cover the cost of the book, but shipping is not covered by your coin balance. For example on my recent order of one book the total cost was $25 for the book including shipping. I had a coin balance of more than 20 coins so the $20 cost of the book was covered by my coin balance and I only had to paid for the shipping of $5.
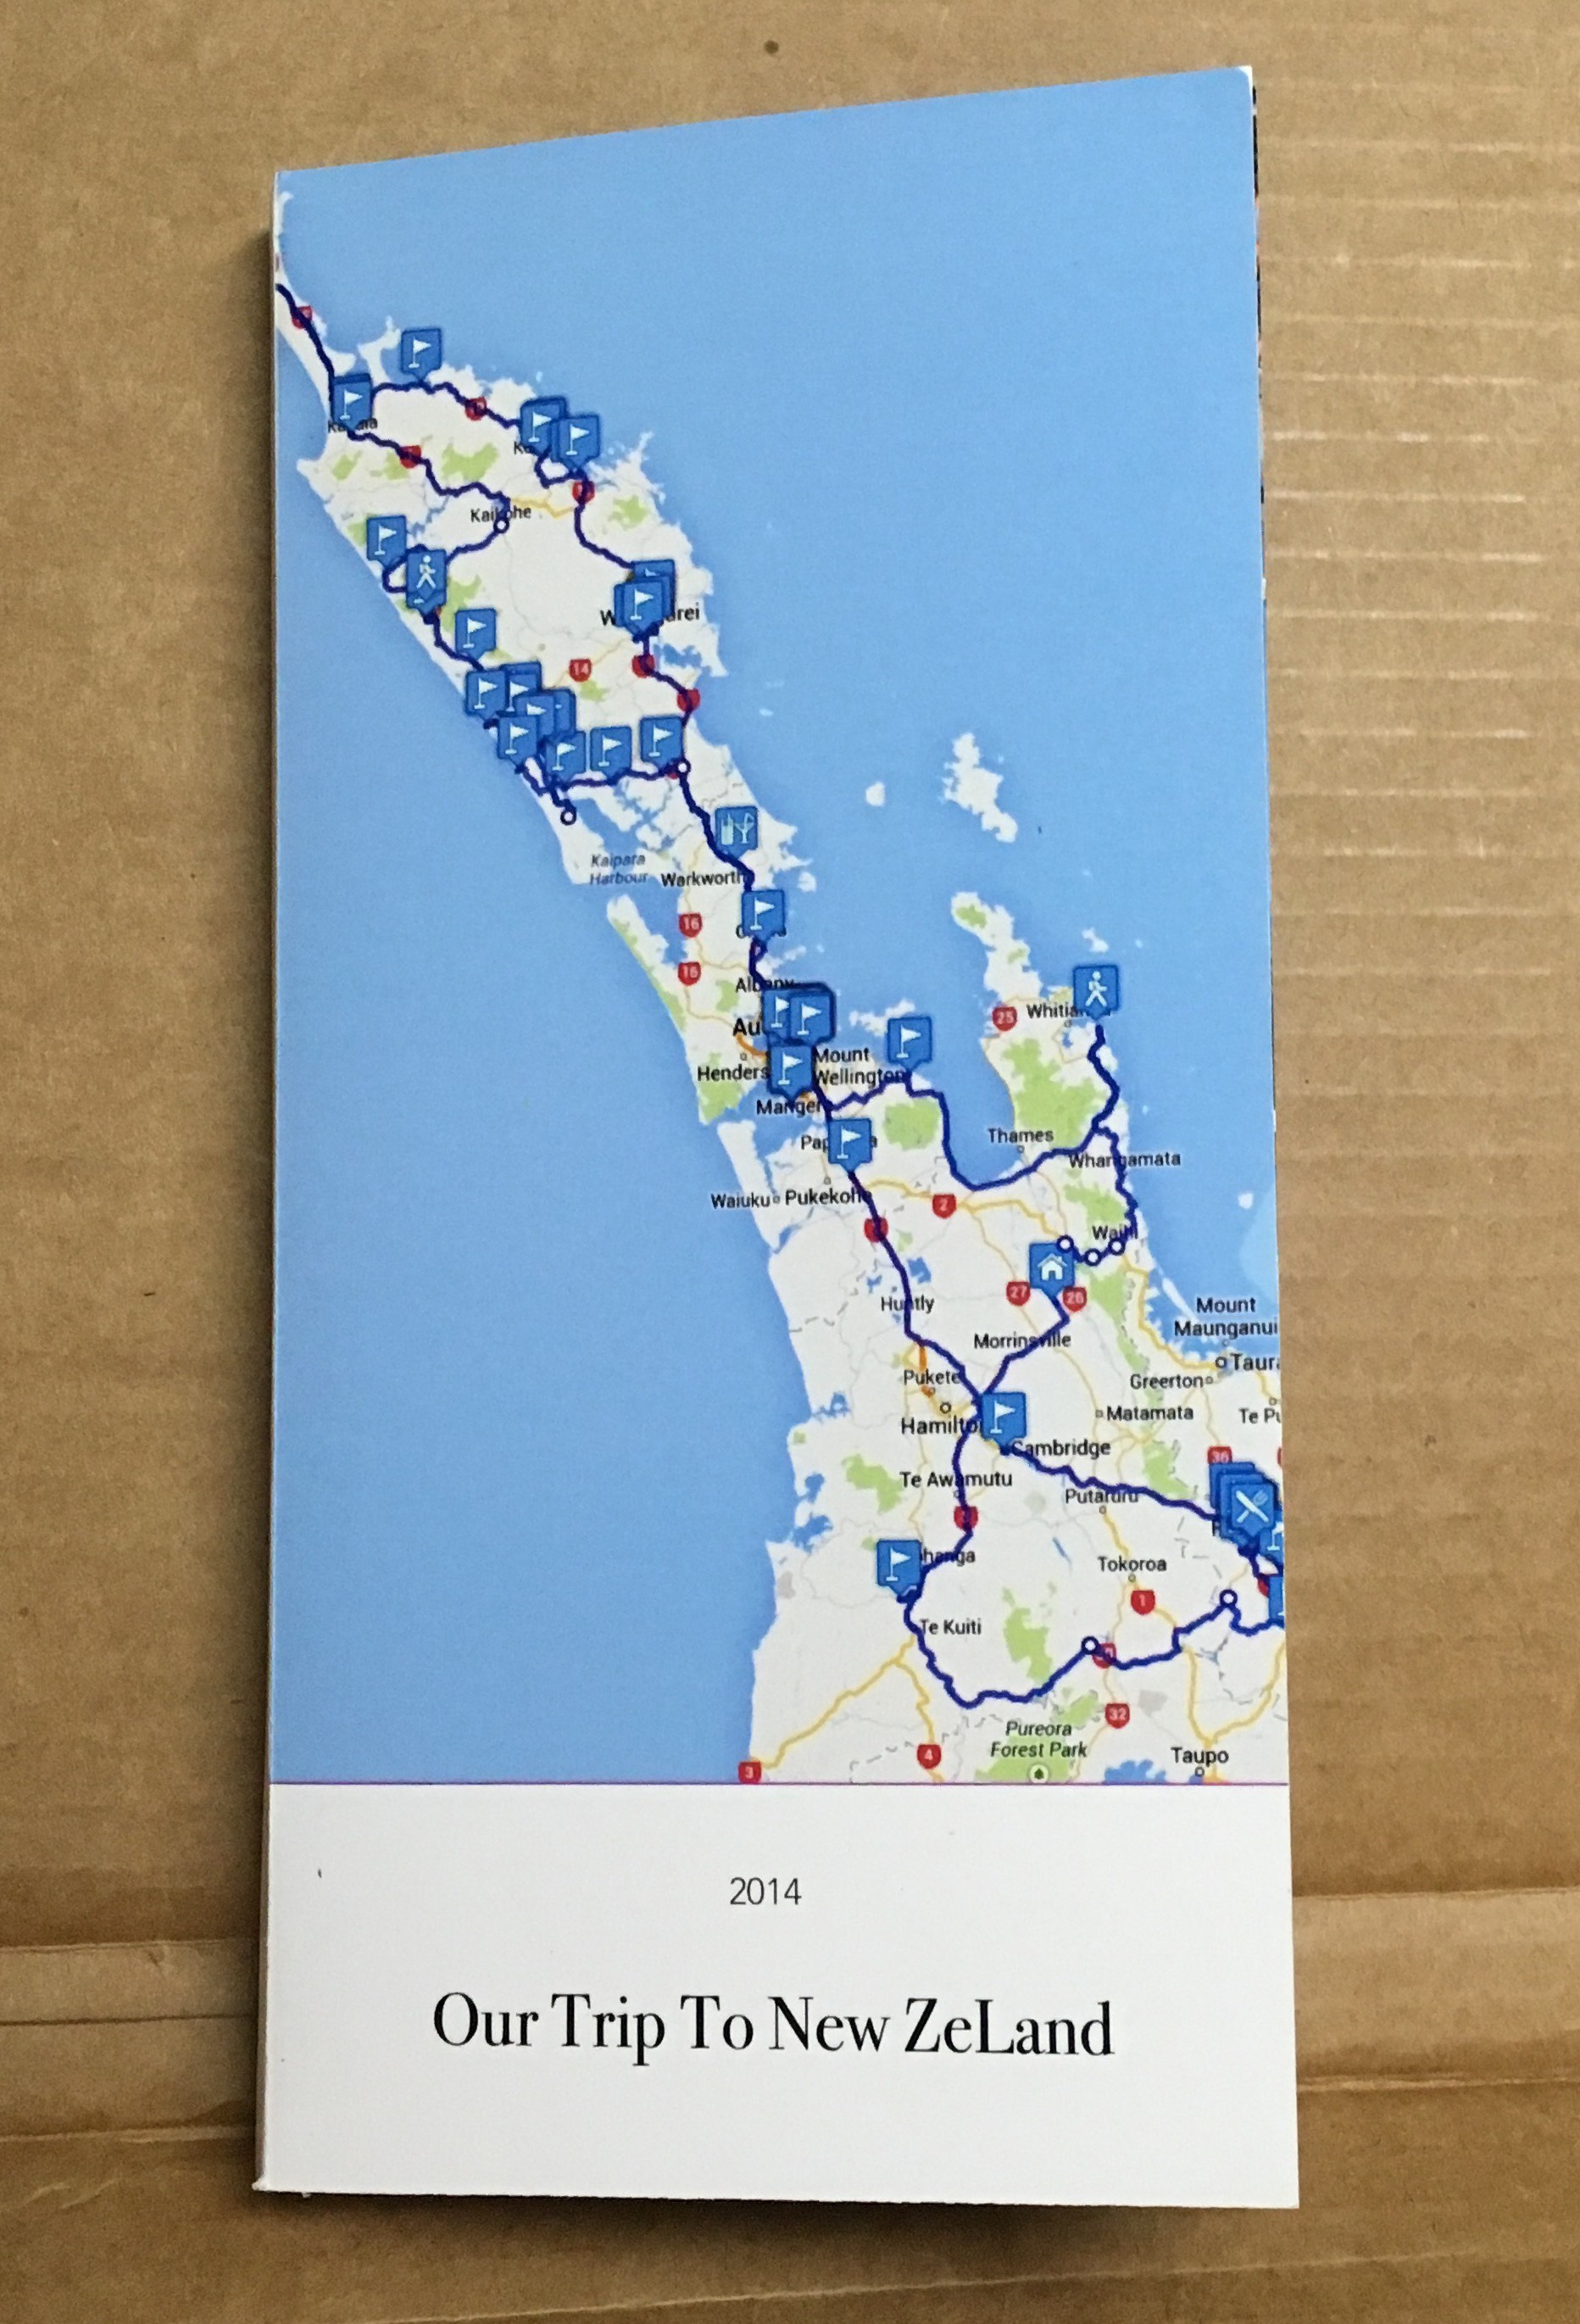
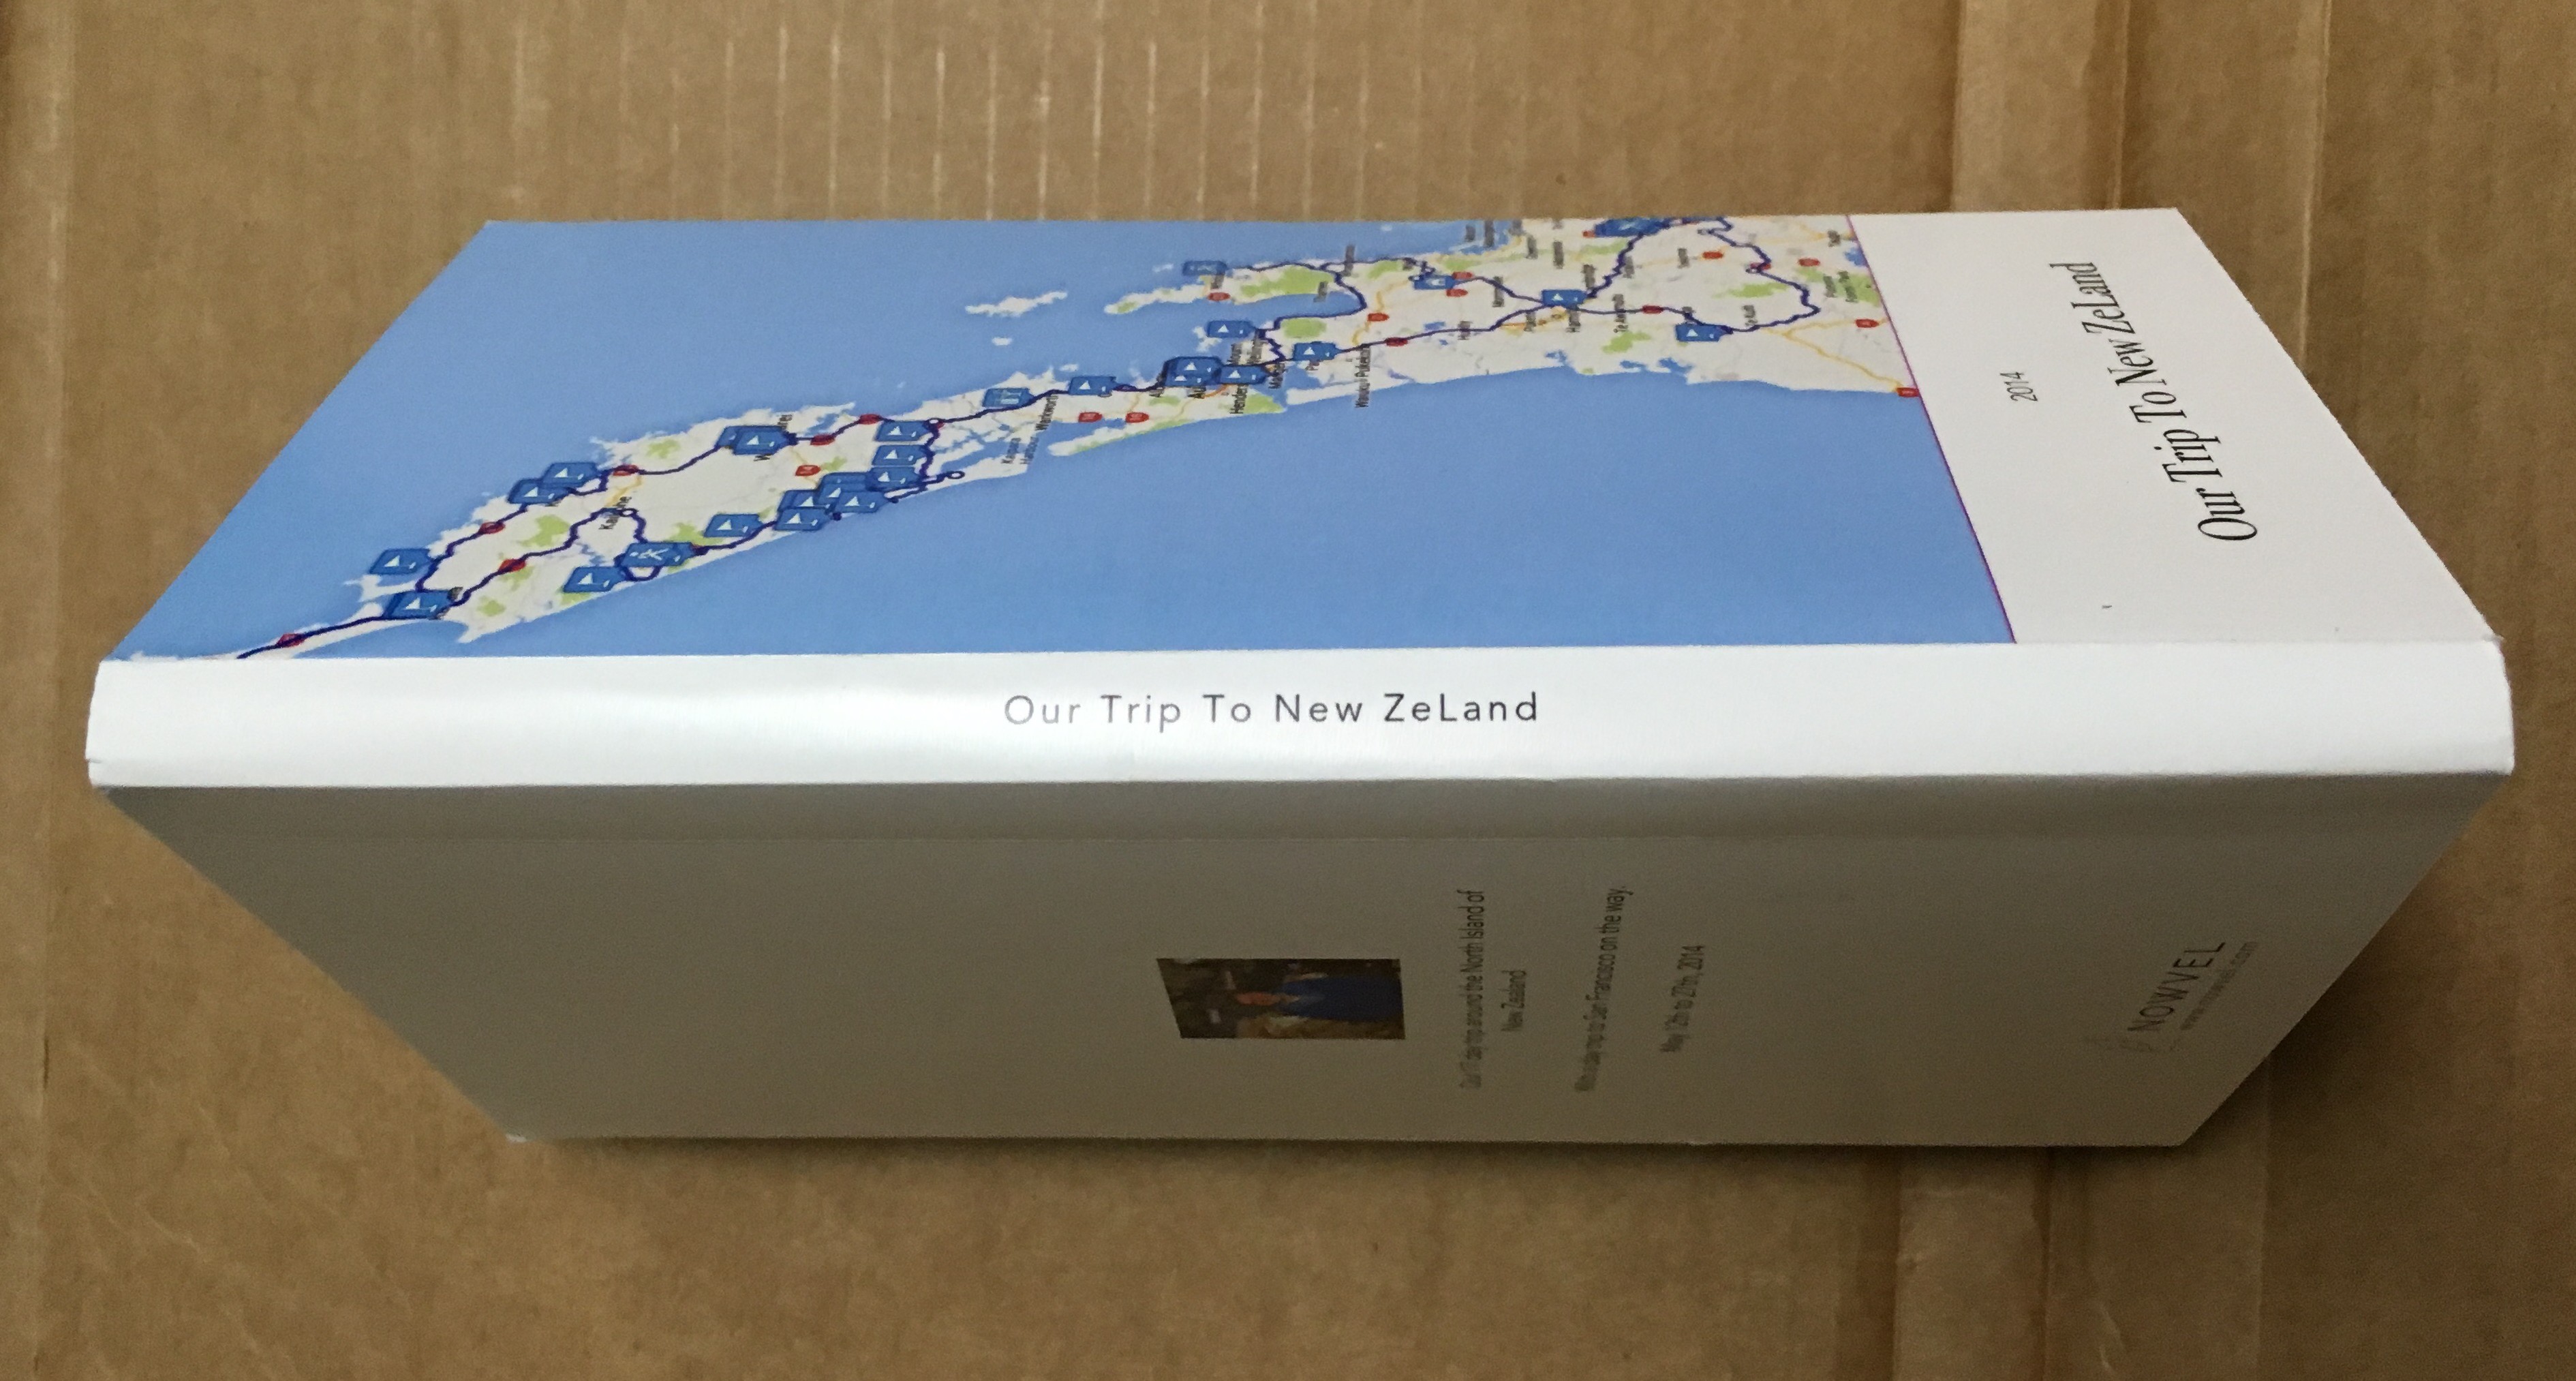
The Printed Book
I ordered my first book on the 22nd and it arrived on the 26th. So 4 days from time of order to arrival I think is pretty quick and it was sent via USPS so you can track the shipment along the way.
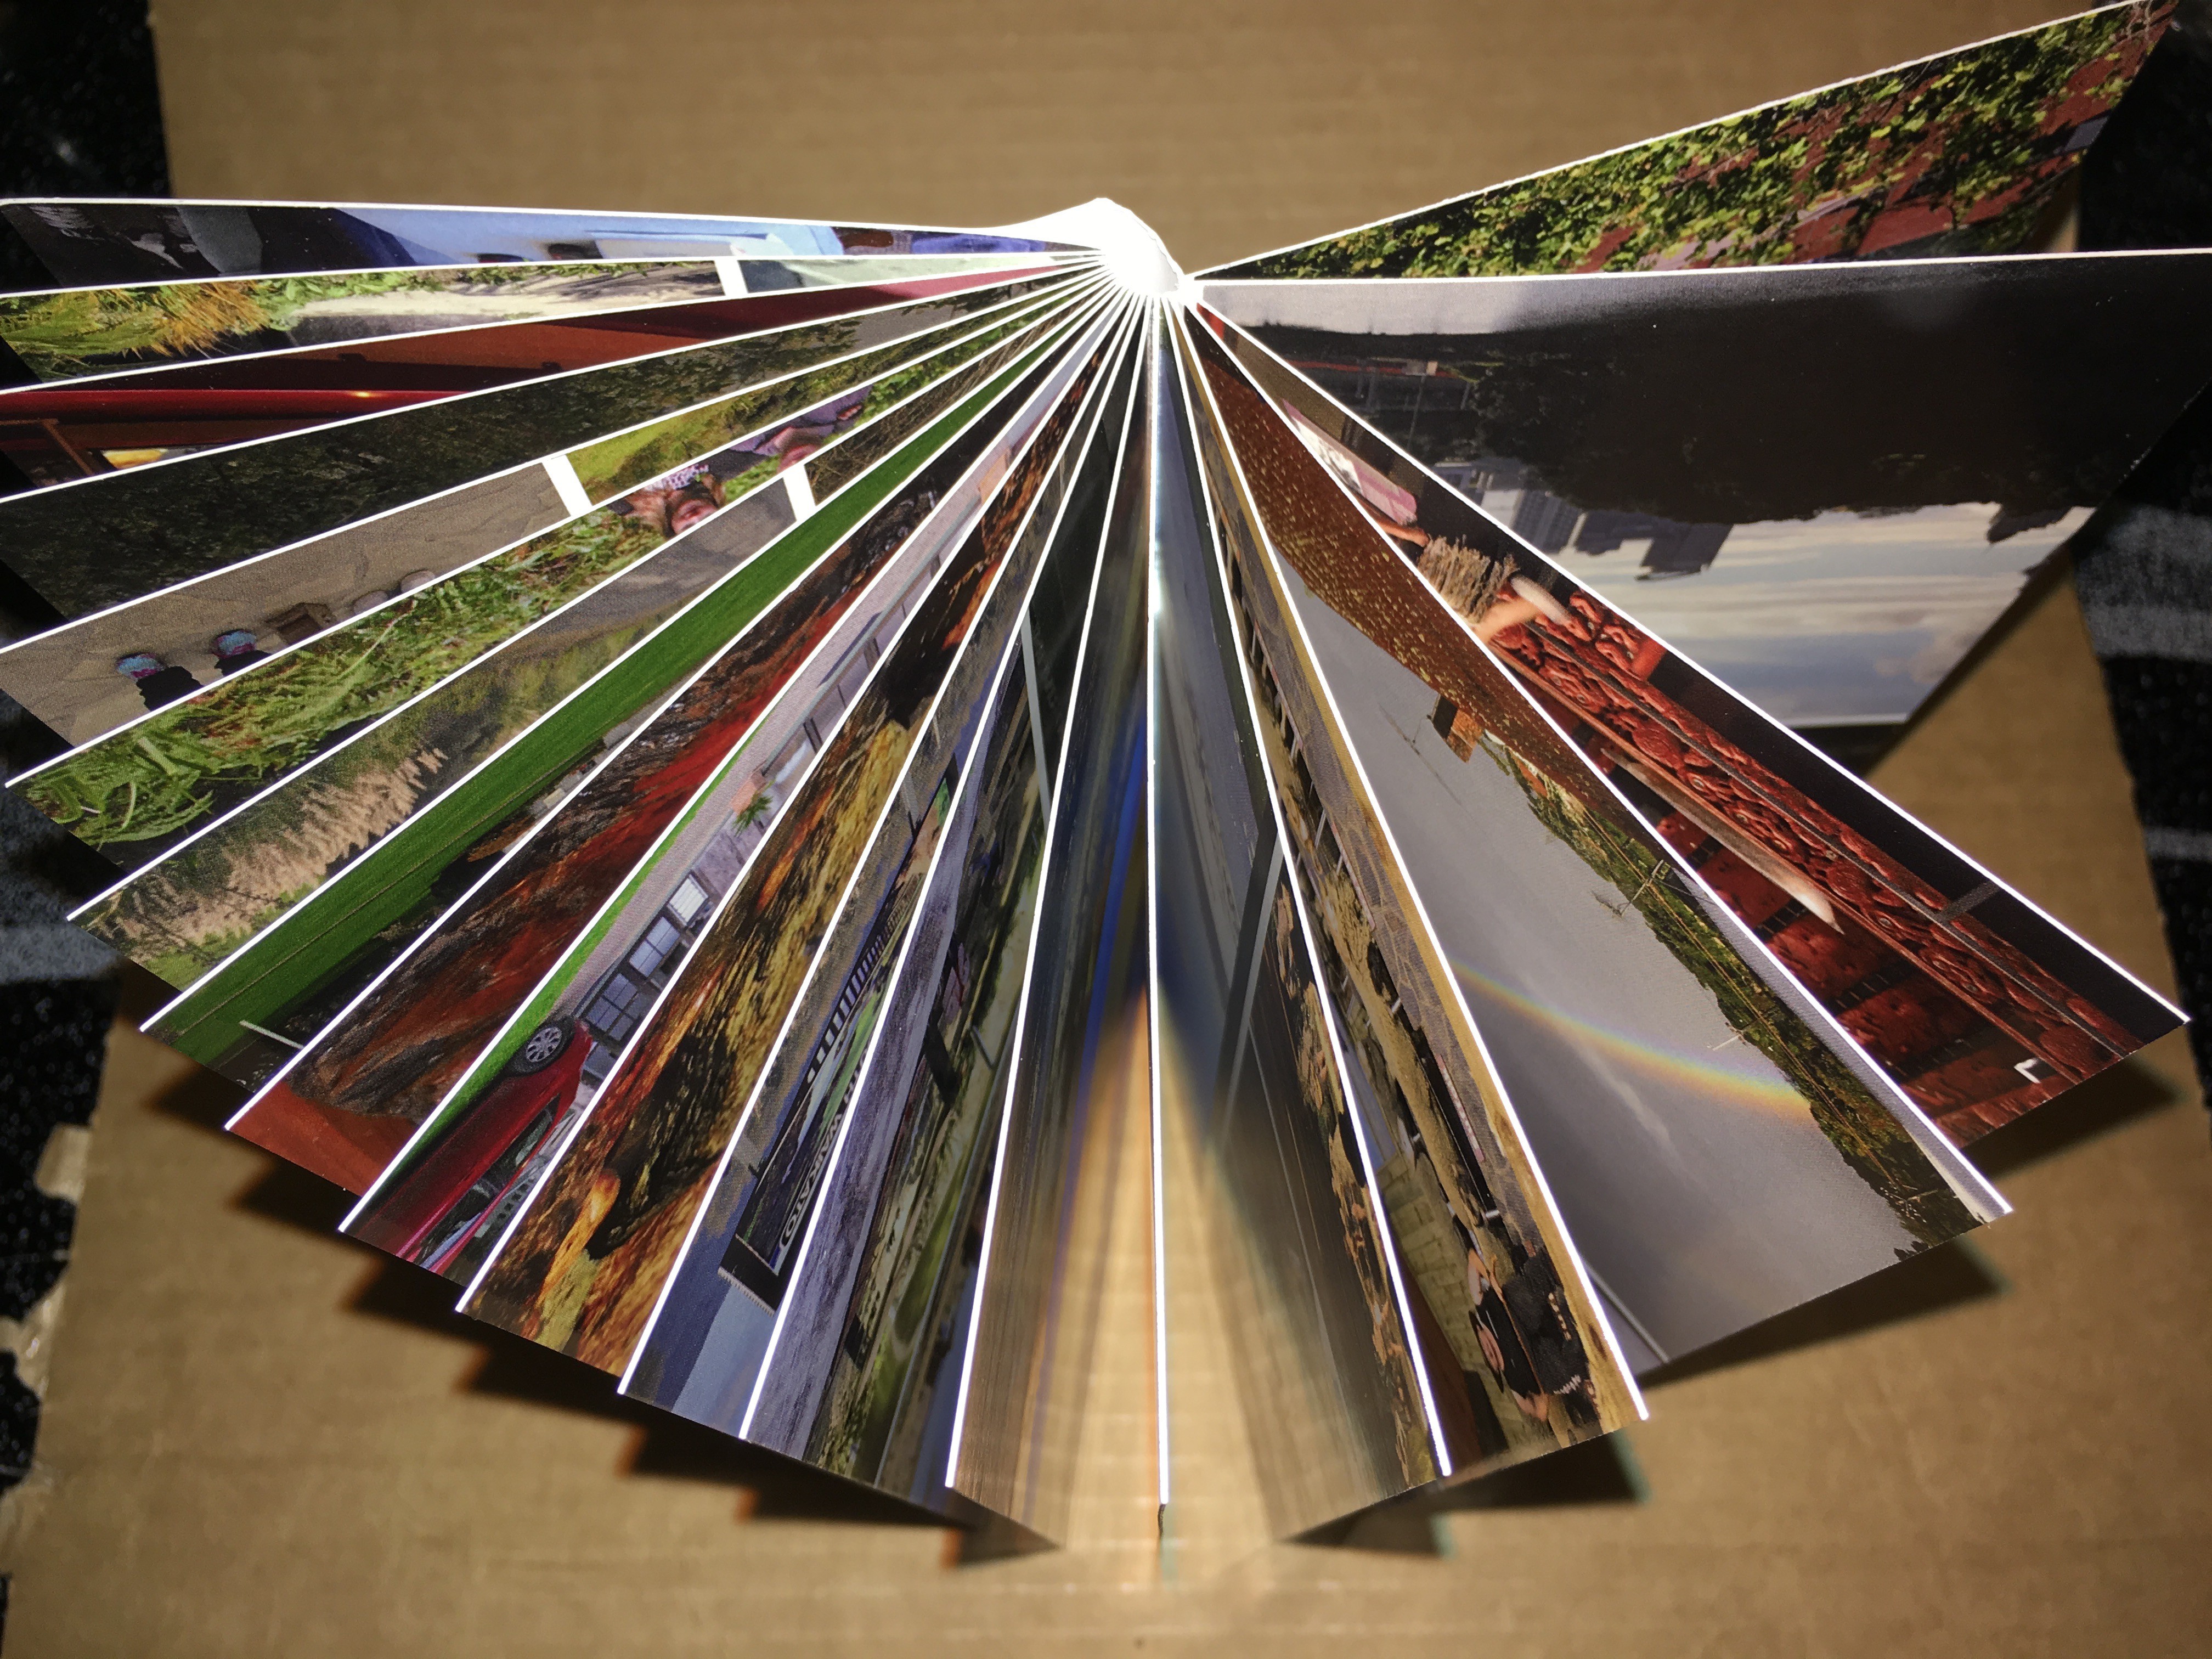
Here are some photos to show the book I received.
The book showing the cover. 4×8 inches in sizeThe outside of the printed book showing cover, back cover, and spineShowing the pages and binding
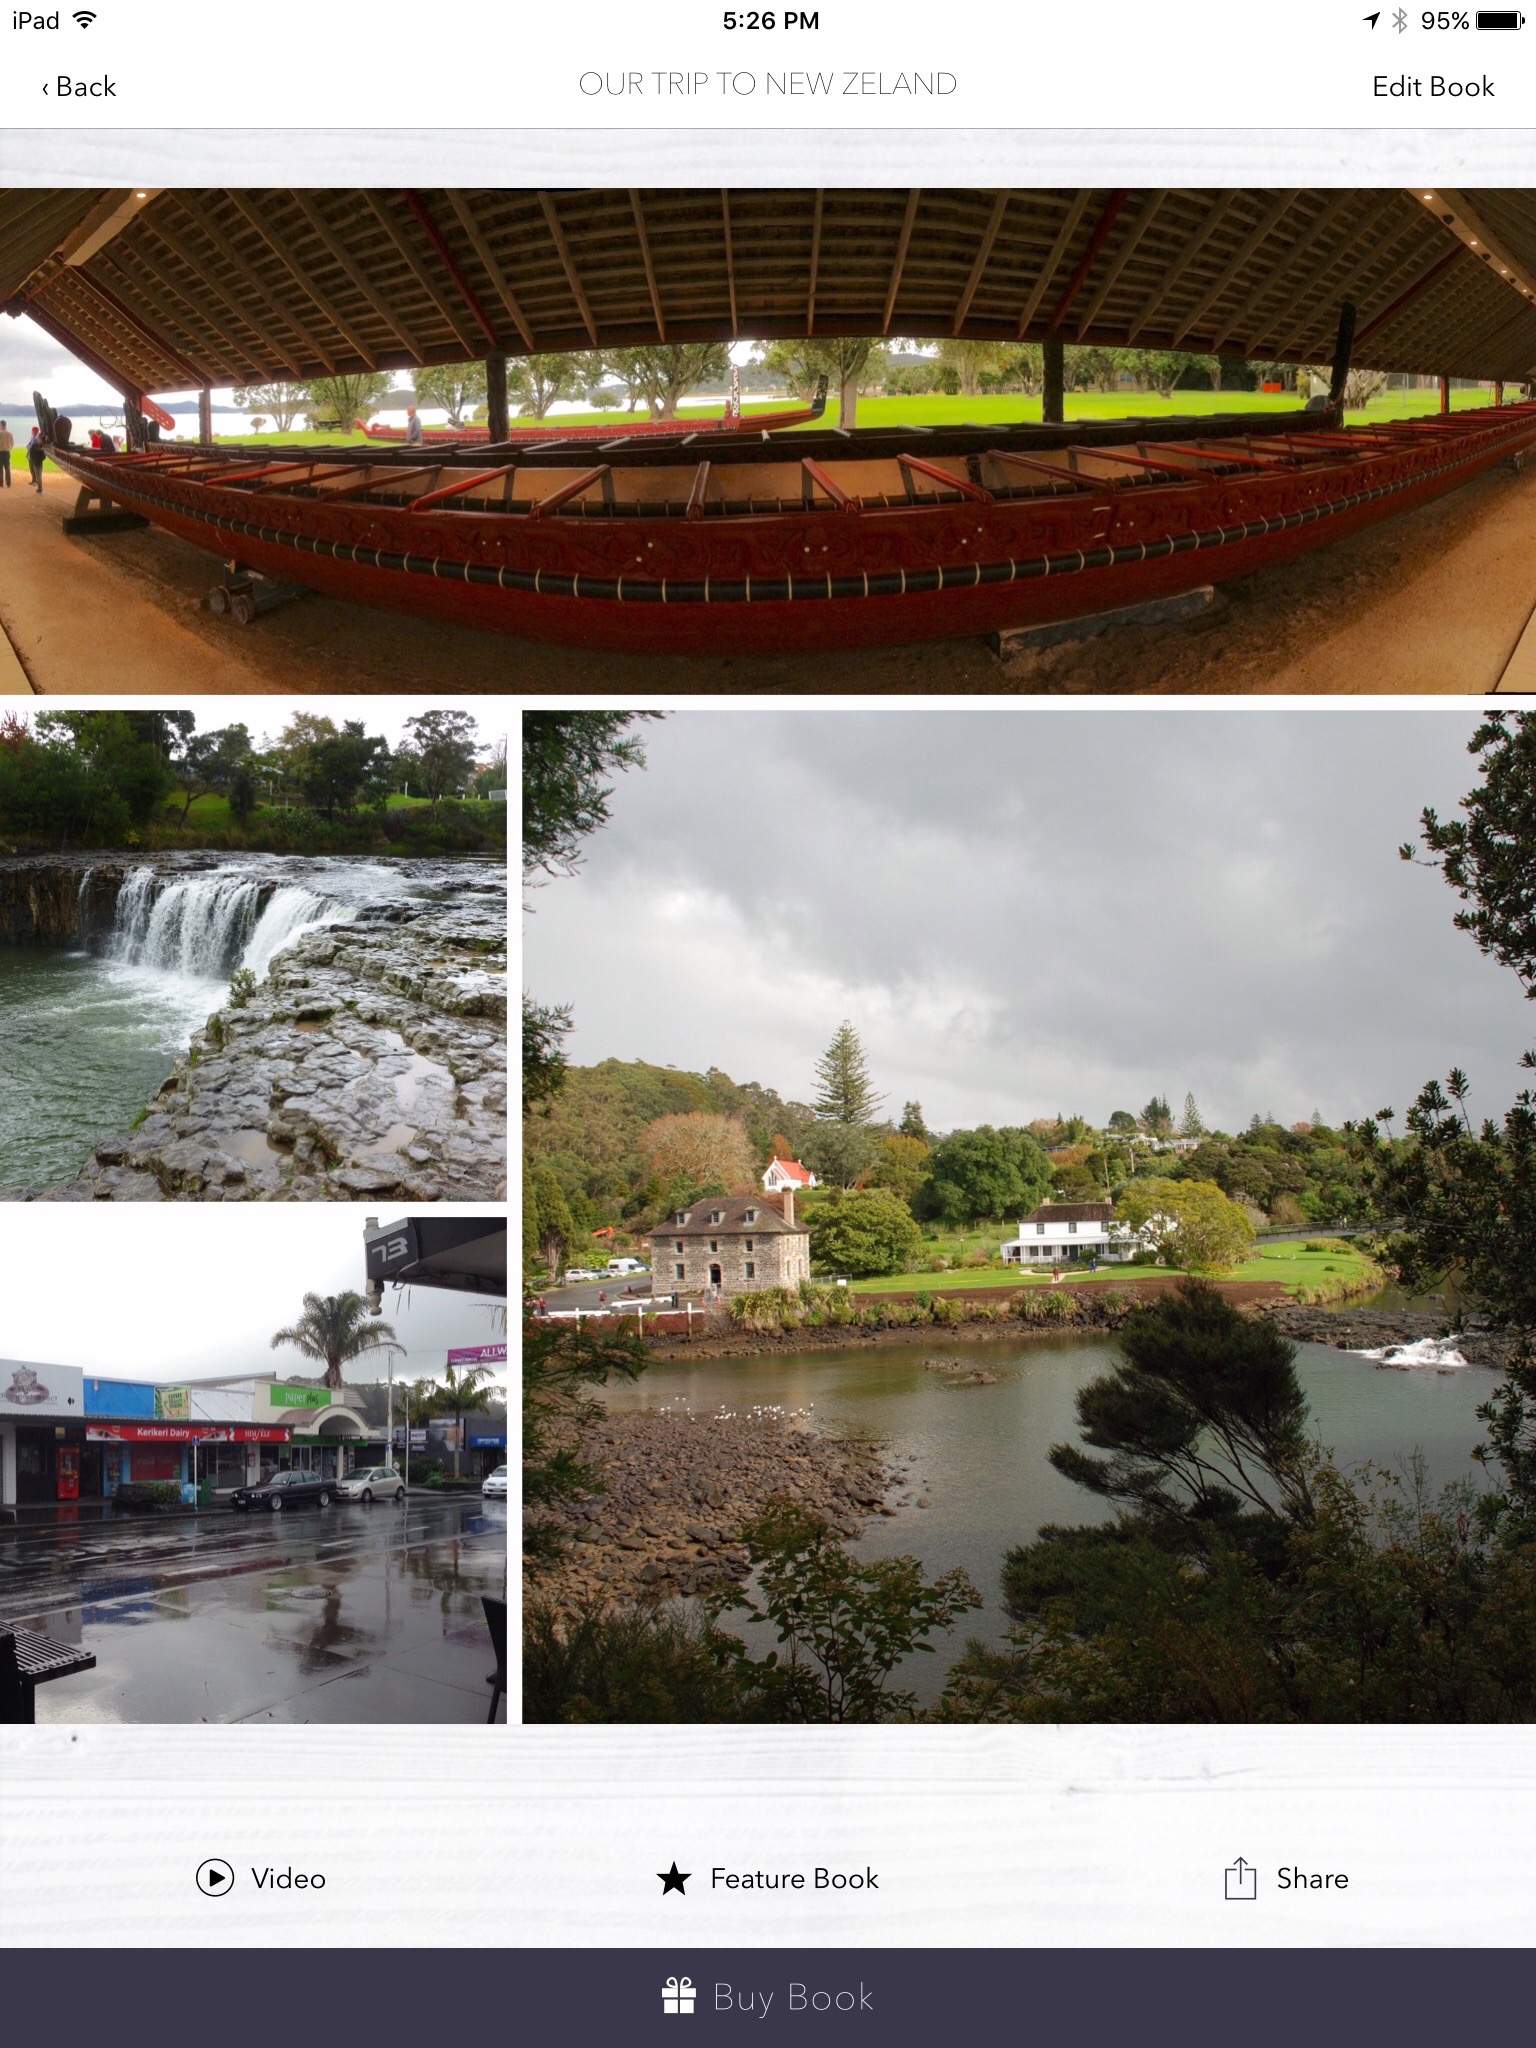
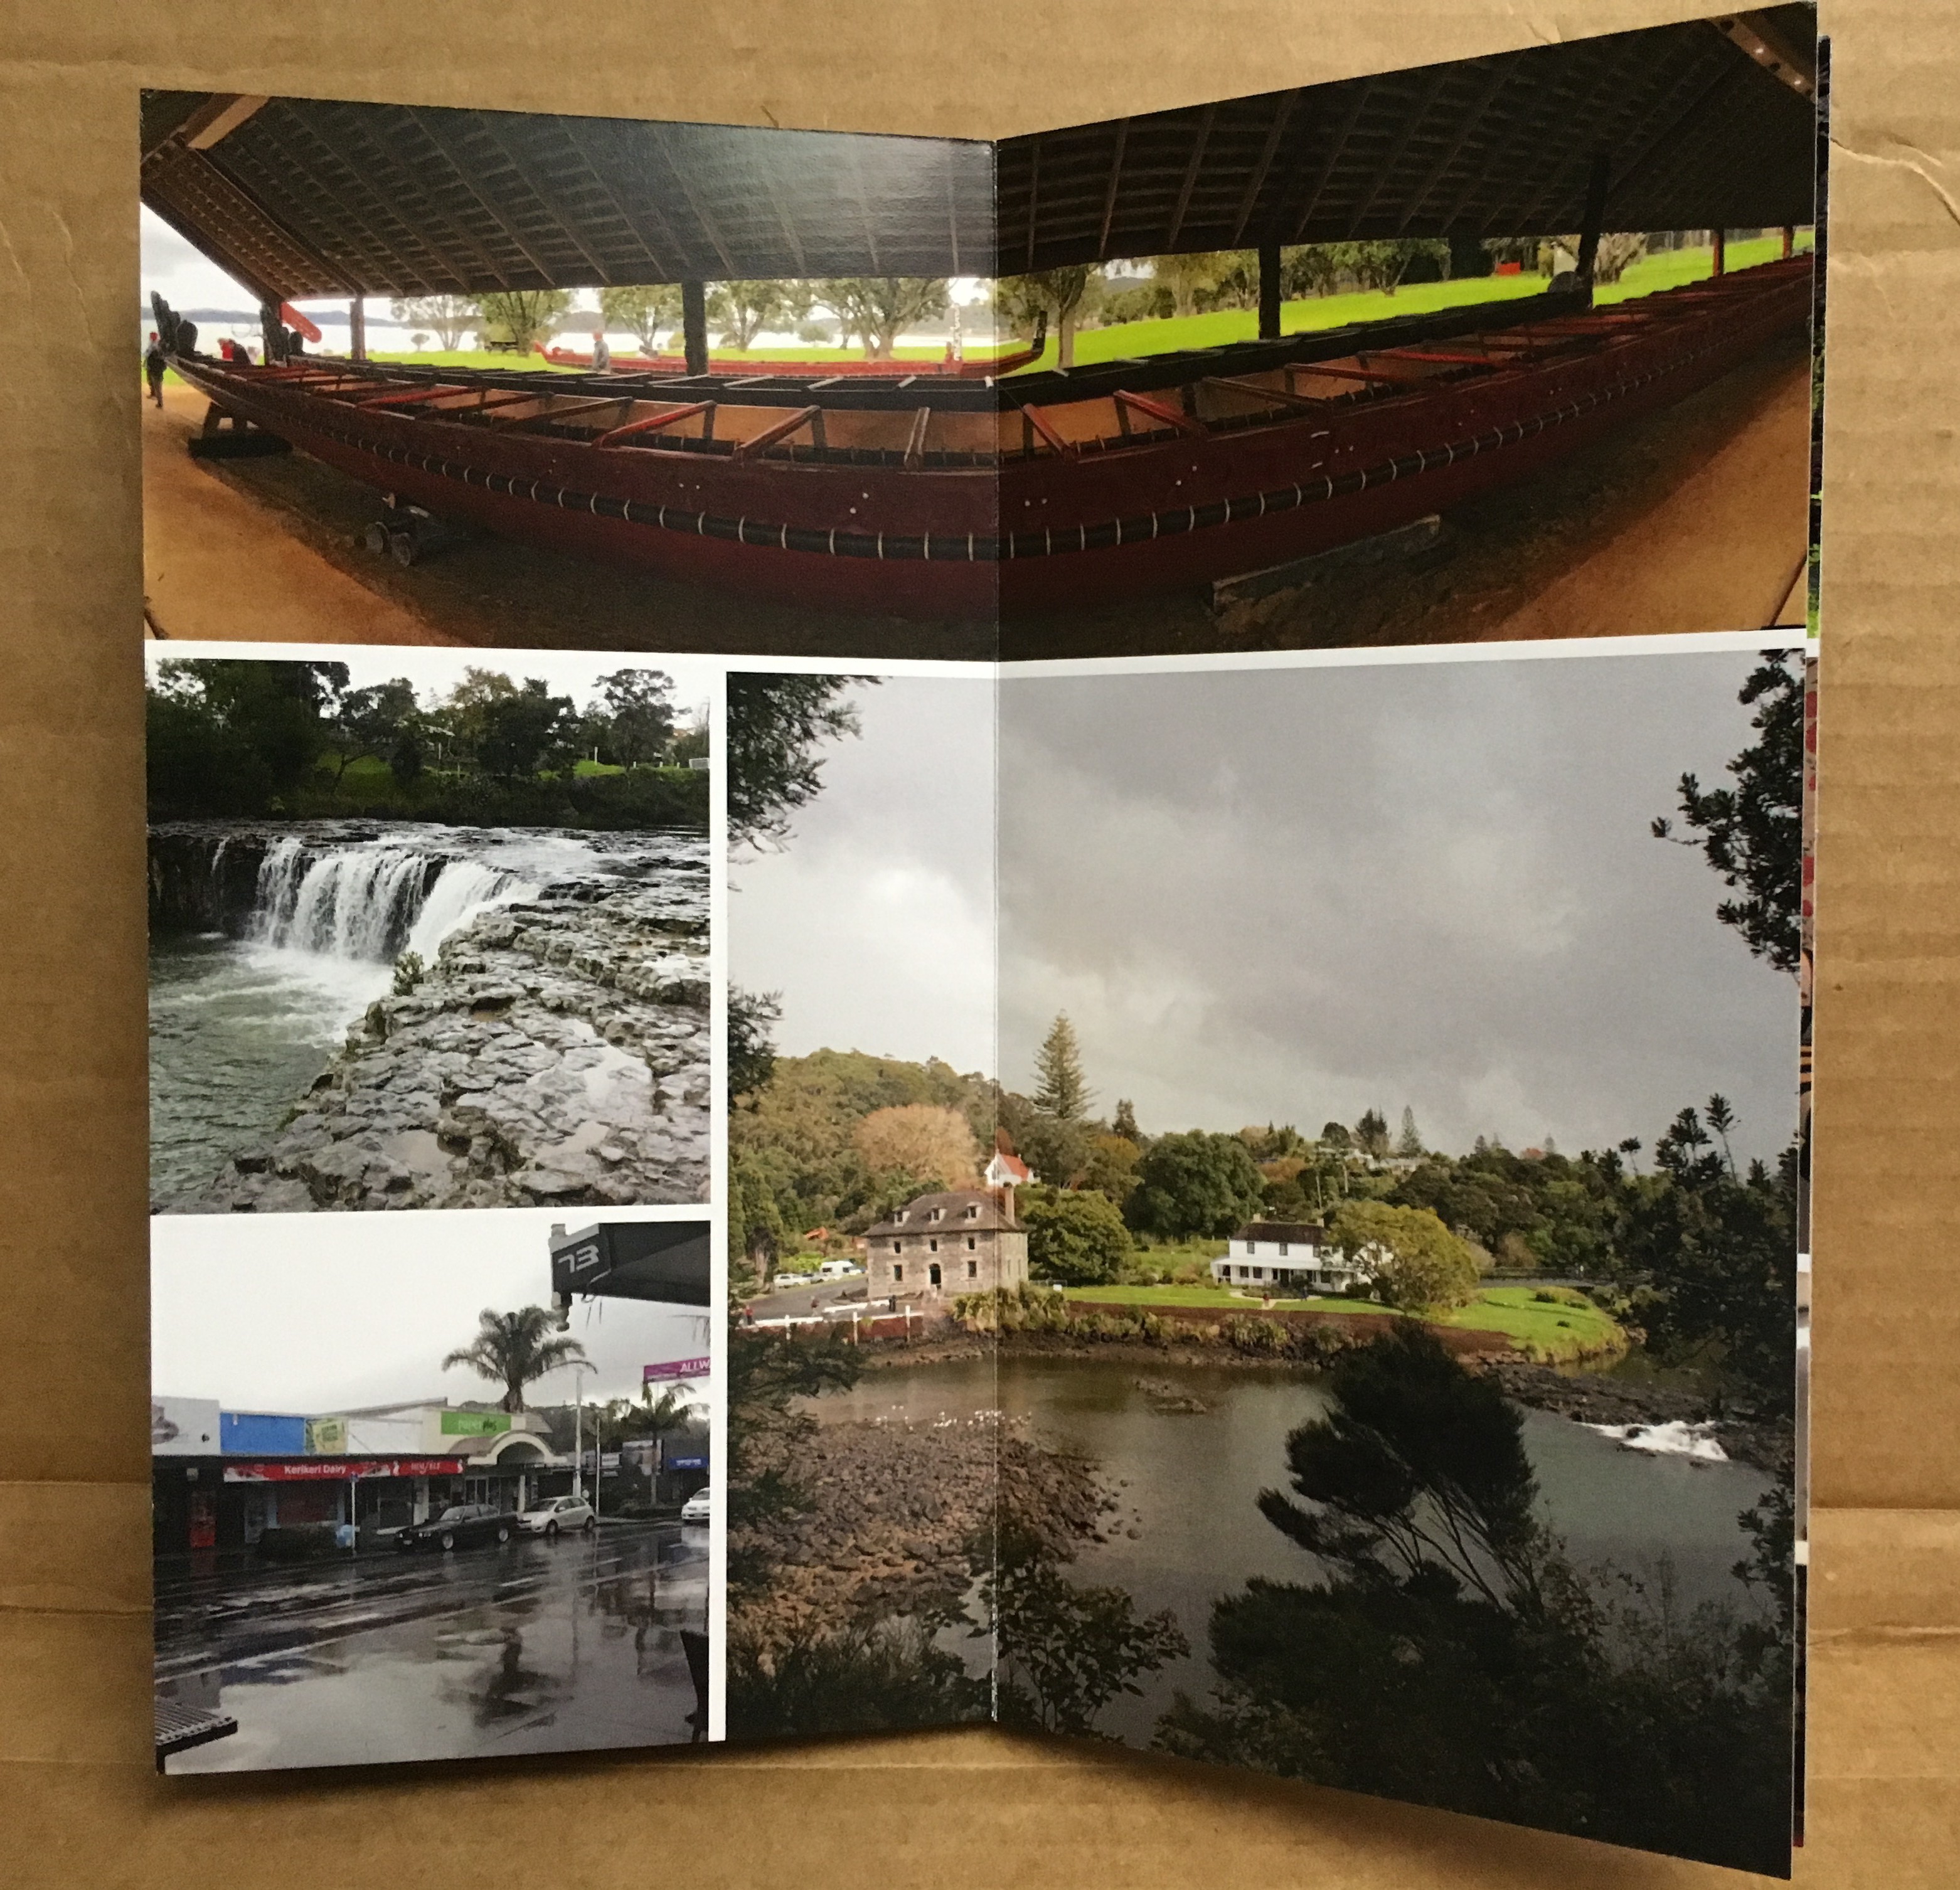
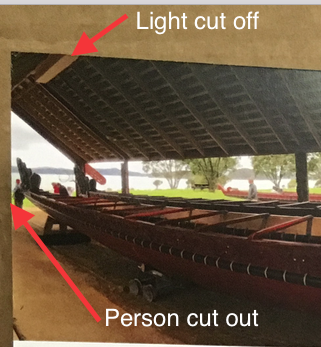
After getting the printed book I realized it is not quite what you see is what you get on the view shown in the Nowvel app. This is not a problem that is isolated to the Nowvel app but a lot of the photo printed book. That being you lose part of your image on the outer edges when you have photos on the edge.
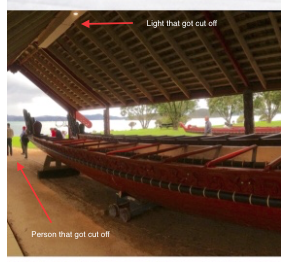
Below I show the full page and close up views of a page from my Nowvel book that shows how much is clipped from photos that are on the edge of the book. My best estimate is about 1/8 of an inch. [post review note: this was spelled out in their faq file and it is indeed 1/8 of inch]
Page as shown in the Nowvel app on the iPadPage show as printed in the bookClose up of the top left edge of the photo as shown in the Nowvel app on the iPadClose up of the top left edge of the photo showing where things were cut off in the printed book
Despite the edge cut off that I didn’t take in account for on a few images and not following my own advise with one image not being center, which were all my fault. I love how the book turned out and will be getting more.
Negatives I see at the moment.
Each device is treated as its own account and as such the coins you earn/enter and the books that you create are only on the device you earned/entered the coins on or created the book on . They are not transferable from one device to another at this time.
One BIG problem I had with the when I deleted Nowvel. If you delete the app from you device for whatever reason you will LOSE all of your coins. When you reinstall the app you will be back to the initial balance of $0. Luckily I still had my promotional notice and was able to have Nowvel support credit my device for the deleted coins.
Since the coins you earn are per device and each device is treated as its own account when you go to order a book you can only use the amount of coin credits you have on that device. It does not matter how many coins you have in total across all your devices. For example, if you have an iPhone with 4 coins and an iPad with 20 and you buy your book on your iPhone you can only use the 4 coin credit from your iPhone even though you had enough coins on your iPad to pay for the entire book.
The program crashed for me when I tried to add an address from my address book for the shipping address during ordering on the iPad. Seems to work on the iPhone, but it didn’t let me select which address of the multiple address I have listed, such as work and home, and it put in the first address listed in my contact card which happen to be my work address. So I’d say there are a few bugs still to be worked out, but I was able to add my address manually with out any issue.
In summary
I do think this is a great app. Once you get the hang of it is very easy to use.
The printed books are have a good solid feel to them and the photos look great on the thick paper pages.
I would recommend you decided which iOS device you are going to use with this app and then stick with just that device. For most folks I think this would be your iPhone anyway since that is the iOS device most use to take their photos. This way you have access to all of your coins when you go to buy your book. You will also have access to all of your custom created books.
I’ve contacted support a few times for some of my issues and they have been very helpful and I’ve gotten responses and resolution within a day in most.
This syncing of books and coins is something that I”m hoping they have in the plans for the future to make it more usable on multiple devices.
If the iPhone is your camera, then I would say this is definitely an app for you.
I would also recommend reviewing their FAQ at https://nowvel.com/faq.html as it gives a fair amount of information about the app.
If you are ready to make the jump, I can help you out a little with a $5 gift towards your first book. Just click on the image below.
Thank you to the buyer from Saginaw, MI who purchased a 30.00″ x 20.13″ metal print of 1965 Plymouth Belvedere. I’m sure it will look great hanging on your wall.
Now along with the discount code you have another way to save.
FREE SHIPPING!!
My photography hosting has generously offered a limited time free shipping offer to any customer from now until the 30th at midnight (New York time).
This offer expires at midnight (New York time) on November 30th. You don’t need any special discount code. Just place your order before the deadline, and shipping will be free!
So if you where thinking of getting something for yourself or as a gift, now is a great time to do it.
One of my favorite photographers has teamed up with Macphun to produce a brand new photo editor Aurora HDR Pro and from the preview videos it looks like the software to have to help you create some great photography.
I”ve got my pre-order in, but I thought I would post so the rest of you could get in on deal now as it will expire soon as the software will be released on the Nov 19th and will be at regular pricing at that time.
I plan on writing my review of the software after I get it downloaded and installed. So look for that later on this month.
But for now…..
Click on the image below and be sent to the stuckincustoms store so you can get your copy today. If you want to learn more about the application, still click the image below and on the store page, click the learn more link at the bottom of each listing.
Just wanted to say thank you to the buyer from Hearst, ON – Canada who purchased a Greeting Card version of my 1955 Ford T-bird Logo Picture.
1955 Ford T-bird Logo
The greeting cards are 5″ x 7″ in size and are produced on digital offset printers using 110 lb. paper stock. Each card is coated with a UV protectant on the outside surface which produces a semi-gloss finish. The inside of each card has a matte white finish and can be customized with a text message up to 500 characters in length. My name and the name of the image is printed on the back of each card along with the Fine Art America logo. Cards can be ordered in a horizontal or vertical configuration. Cards can be ordered with a white background or black background. All greeting cards ship within one business day of the order date! Each card comes with a white envelope for mailing and gift giving.
Just found out today that I got published again in the Johns Hopkins Federal Credit Union 2016 Calendar.
This year I have the honor of having not one but two of my pictures featured in the 2016 Calendar, one of which made the cover.
The cover photo of the 2016 JHFCU Calendar is a cropped version of one of my Baltimore Inner Harbor Panoramas. Here is the cover of the 2016 Calendar showing my photo
JHFCU 2016 Calendar with a cropped portion of my Baltimore Inner Harbor Panorama
The other is one of my photos that I took during the Sailabration event in Baltimore and is of one of the reenactments at Fort McHenry. It is the photo used for the month of September and shown below.
Photo used in the 2016 JHU Credit Union Calendar of a reenactment at Fort McHenry during the Sailabration events in Baltimore
As always I’m humbled to have my images selected.
At first I didn’t even notice that I made the front cover as I just assumed my images would be on one of the interior pages. I did see the photo, but didn’t look at the caption right away and thought, looks like one of my photos but I didn’t send one in this format so it could not have been mine. I had sent the Panorama version in for possible use on their website, but I have no problem with the crop they choose as it looks great. Pays to pay attention to the details and read the caption. Anyway, very happy I’m on the cover as well.