Picture of Me and two of my favorite photographers

Went on my first PhotoWalk(s)

This past weekend I went on my first photowalk(s) ever and had a blast.

I’ve always heard about photowalks and seen many scheduled via www.meetup.com, but never got around to actually going to one. But this past weekend, one of my favorite photographers (Trey Ratcliff) came to 2 cities near me, so I said to myself, you have always wanted to meet him and now is your chance. So no more excuses, it was time to go on a photowalk.  And it was Free. Can’t bet that. (note: some of the other photowalks I’ve seen on MeetUp charge a fee to attended)

Let me tell you, it was an amazing experience. No only did I finally go to Philadelphia for the first time, but got to meet a great bunch of photographers in all skill levels, all of whom were very willing to talk about what they know with you.  Got to learn a little along the way as Trey would make stops along the walk and discuss why he choose to stop to take a picture along with tips on taking a picture of the subject and general photo tips and tricks.

The first walk of the weekend was in Philadelphia. A city I’ve driven through and around, but never actually been to. Since I’ve never been I decided the photowalk was a good excuse to go.

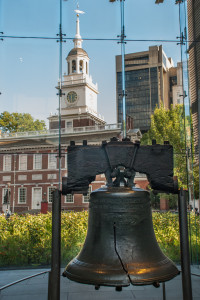
After my three and a half hour drive to Philly, I arrived a bit before the pre-party so decided to visit the Liberty Bell. I’d say it was kinda cool seeing it for the first time. Located at the end of the visitors center in which you get to read and see all the history associated with it.

The Liberty Bell
The Liberty Bell

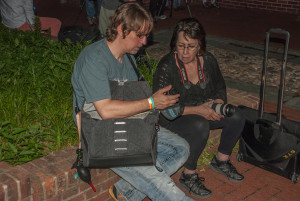
After visiting the Liberty Bell it was time to go to the pre-party before the real walk started. Got to mingle a little with the other photo walkers along with meeting Angela B Pan for the first time, who is photographer from the Washington DC area and a Master in the Arcanum

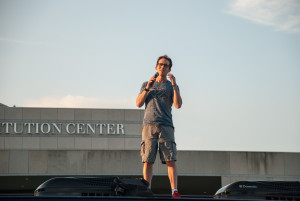
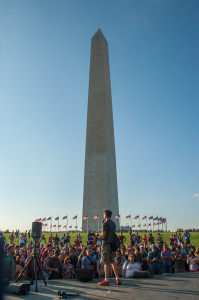
Just as the walk was about to start, Trey got up on the roof of his tour bus to introduce himself and talk about the walk that we were about to go on.

Trey Ratcliff addressing the group from on top of his tour bus.


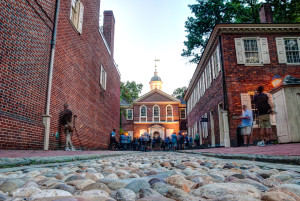
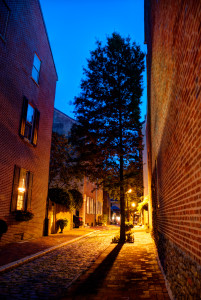
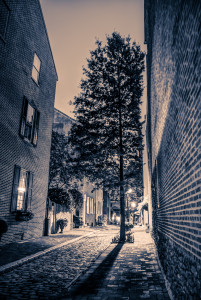
Shortly there after we headed out on the walk and the many stops we had along the way. Here are a few of the photos I took along the walk.

Trey talking his picture of independence hall just before talking to the group about the photo
An Arcanum Master talking with a fellow photo walker
A picture of the group of photo walkers at one of the stops
An alley in the Olde City
An alley in the Olde City Black and White Version

Headed home after the walk and after quick two hour drive home to arrive at midnight I stayed up till 3am to process and upload my photos to enter into the online contest for Philadelphia photowalk.

After getting some sleep it was time to get going for round two in Washington DC

Just like in Philly, arrived early for the pre-party to gather with the other walkers and await Trey to introduce the walkers to the DC leg of the trip. And then head out to the various stops. Again, at each stop, Trey would describe what he was seeing, why he decided to stop there to take a picture, and then some tips and techniques for taking a better photo of the scene.

The DC walk was a bit longer than the Philadelphia walk, so I was a little exhausted by the end of it, but still had a great time.

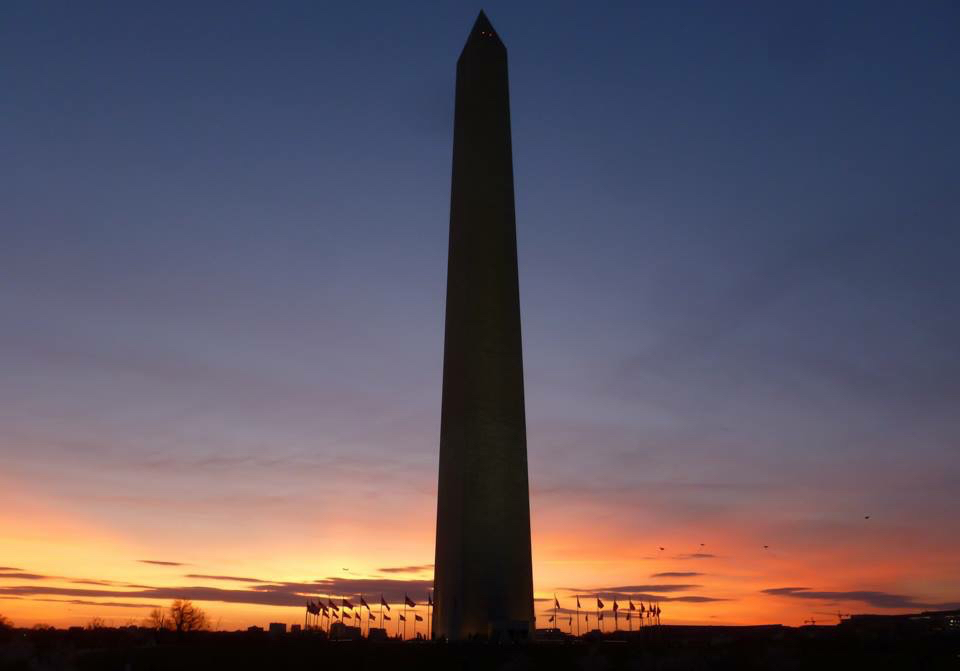
Here are just a few of the photos I got on the DC photowalk

Trey on the Sylvan Theater Stage addressing the crowd
Lincoln Memorial and reflecting pond

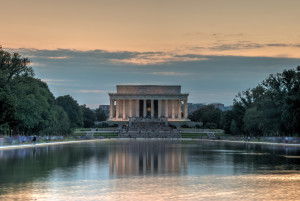
This was Trey on one of the stops at the reflecting pool where he described that getting down low is needed to get the reflection on the water since the water was a little choppy that day. You can sorta see the choppy water in the picture above as I didn’t get down as low as he did in his shot.

Trey and one of his daughters
View from the Lincoln Memorial

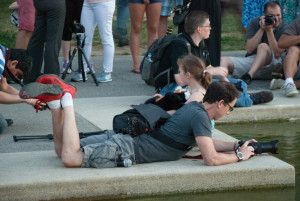
After taking this photo I realized I had lost where the group had gone to. Never did catch up to them at the last stop, but just headed to the after party.  I will say if you do get detached from the group, the page for each city usually has a map or at least a path that they plan to follow. You can use this to find out where the next planned stop is and just head that way and I”m sure you will catch up with them.

At the end of the photowalk there is an after party. This is the only part of the experience on Trey’s photowalk that you pay for if you wish. If you can afford it and there is space available still, I would recommend it as you get more personal time with Trey and the other photographers from the walk including any Masters of the Arcanum from the area. You can pretty much ask Trey anything or just talk in this more casual smaller setting. I attended the after party on the Washington DC leg of the trip and was able to get my photo with two of my favorite photographers (Trey and Angela) as shown below.

It turned out being 2 very long days, a lot of walking, and staying up late to process photos for the contests, but all very well worth it.

So if Trey is coming to a city near you, I would recommend getting your self out there. You won’t be disappointed.

For information on Trey’s USA photowalks go to tour.treyratcliff.com and see if a city near you is still on his list.  As of this writing he is about halfway through his USA tour. And remember, the photowalk part is Free. So no excuse not to go.

Check out his website www.stuckincustoms.com to see his amazing work and check out his tutorials and other photography information. Many of his tutorials and presets are free, but he does have more in-depth tutorials and other photography items there as well for a fee.

Also, check out a local DC photographer who I’m sure will inspire you to take better pictures of the Washington DC area, Angela B Pan at www.abpan.com

I had the pleasure of meeting both at the DC after party.

Picture of Me and two of my favorite photographers
Me (Mark Dodd), Trey Ratcliff, Angela B Pan

Print of “Arches” Sold

Wish to thank the buyer of my photo “Arches” in Europe. Since I see the place as APO AE I also wish to thank them for their service to our country, be they active military or a family member who stationed overseas.


Arches - the ceiling of a Washington, DC Metro Station
Arches – the ceiling of a Washington, DC Metro Station


Washington DC Day Trip

Washington Monument at Sunset

Back in April I decided to take a day trip to Washington DC, only an hour or so down the road from me. It is one of those places that is awesome to go to, but since it is so close I often neglect it.

Of course it was right in the middle of the Cherry Tree festival of which I’ve meant to take pictures of forever and finally decided it was time to do it.  Although it was a hot day and there were a ton of people there also admiring the trees the trip was well worth it. Worth it just to see the trees in bloom and I think I ended up with a few really good shots.

Oddly enough, one was nothing to do with the Cherry Tree festival, but the Washington Monument at Sunset. I had just taken the obligatory picture of the White House as was on my way back to the Metro stop and had to walk past the monument and the sky was just lighting up colors from the sunset so I had to stop and take a picture.

I’m finally getting around to start processing the rest of the photos that I think might be good, the White House not being one of them. 🙁  Couldn’t get across the street to take a picture through the fence as they had it closed off. Guess it was due the recent fence jumpers.

Here is a link to one of the Washington Monument Photos I’ve posted to my site as the feature image above doesn’t do it justice.

Washington Monument at Sunset posted on AmericanKiwiPhoto.com

Planning on another trip in August as one of my favorite photographers will be in town so if you are a fan of Trey Ratcliff check out his Photo Walk Tour page at tour.treyratcliff.com

Sold a print of the Naval Academy Chapel Dome

I’m always grateful to anyone who thinks one of my photos are worth purchasing and got surprised by a sale that occurred back in April.

Why I say surprised is that I had no idea as I seem to have missed the email letting me know. Got the email today of the payment transfer and was like, what? So naturally I checked to see I sold a 10.00″ x 8.00″ print of Naval Academy Chapel side Dome to a buyer from Virginia Beach, VA.

So a very belated thank you to that buyer.
large-line-item-811599


Need someplace to sell your own artwork online

Need someplace to sell your own artwork online, consider

FineArtAmerica.com

You can sell up to 25 images for free and have them professionally printed and framed. They also offer a variety of media to have your art printed on.  If you decide to host more than the base level of images, their pricing is ever inexpensive.

They take care of the entire process for your customs. Printing, shipping, returns, and processing customer payments.


Bluehost – A complete web hosting service provider.


Red River Paper

A great selection of paper for your printer from Red River Paper.

728x90-std


My experiences and tips when migrating my Aperture library to Lightroom

I’ve finally decided to take the plunge and migrate my Aperture and iPhoto libraries to Lightroom. The following will be a description of my experience and any tips I may have to help with the migration. For this test I will be migrating my Aperture library from my New Zealand Trip.

First, it was a tough choice to decide to migrate to Lightroom. I had held off until Apple released its Photos App to see if that would do what I needed.  Now that it has been released, I’ve realized that if I want to continue with the post processing the way I would like to I would have to make the switch. Although Photos is a is a great app in itself and will suit many very well, for my purposes, it doesn’t have all the options I would like.  I will miss the integration that Aperture and iPhoto had with my various Apple devices and each other, but I think it will be worth it in the end.

So before I began just diving in and doing the migration I decided to do some web research on the best way to do the migration.  All the sites that I found agreed on a few points, some have more recommendations about keywords, but here is what I took out of them.

  1. This will be a slow process in that the pre steps take some time for the Aperture app to complete.
  2. Get your house in order before doing the transfer, that is to say, get things cleaned up in Aperture/iPhoto before you move.  Again, this can be time-consuming and in my case will be, but I think it is best to do the cleanup in Aperture/iPhoto since I”m vary familiar with how they work and I will know what I’ve imported into Lightroom will be a clean import.
  3. The biggest recommendation seems to be to generate full-sized image previews in Aperture before migrating into Lightroom.

Since I’ve been using iPhoto and then Aperture over the years I found I had several different libraries for various projects a mix of general photos in both.  I started the migration process by merging all the Aperture and iPhoto libraries together into one master library for each app of the general photos and left 2 Aperture libraries as it as I knew that were clean and I wanted to keep those project seperate.  If your individual libraries are good and you want to keep them in separate Lightroom libraries this is not necessary, but for me, I had photos all over the place and wanted get ride of duplication and know what I had before migrating.

After doing the merging I proceeded to do a test with my New Zealand Trip Aperture library. So here are the steps I did

  1. Generate Full Resolution Previews.
    • To do this in Aperture, Open Presences, select Previews, Change the Photo Preview to Don’t Limit, Select the Photo Preview quality at least 10 or higher.Aperture Prefences
    • After changing the preferences you need to actually generate the preview by going to the Photos menu and select it, then hold down the option key so that you change Update Preview to Generate Preview, then go down and select the Generate Preview to create the new previews
    • This process even on a small 11000 image library did take several hours on my iMac. The speed will depend upon your library size, computers processors speed, memory, and hard drive speed, so results will vary.
    • Also, it may look like Aperture has crashed, when in fact it has not.  I use the Apple Activity Monitor to make sure something is still happening. Even in the monitor it may say that Aperture is not responding while it is building the previews, but if you keep and eye on the CPU usage and the I/O you will see something is happening. You just need to be patient and the task will eventually finish.
  2. Make sure you disable the shared connections before leaving Aperture.
    • During my first import test I noticed I was getting pictures that were not part of my Aperture library. After looking at what they were I determined that they were coming from my flickr and other shared accounts that I had set up in this library
    • For flickr and any other connection you have under the Shared section in Aperture, disable the connection so that you are not also importing these pictures into your new Lightroom catalog.Flickr Disable Screen
    • Check your Aperture trash and empty if needed after disabling the shared services as photos that were downloaded, but not part of this library will be moved their when you disable the service.
  3. IMPORTANT if you have RAW + JPEG pairs.
    • I discovered that this import script will only import either the RAW or Jpeg photos that have RAW + JPEG pairs but not both.
    • As a result you will need to decide which format for those pictures you have as RAW + JPEG pairs to be imported into Lightroom. You can tell if you have any that are RAW + JPEG pairs but selecting Photos in your library then in the search box check File Type and select RAW + JPEG. This will show all the photos in the Aperture library that this will apply to as shown hereRAW + JPEG pairs
    • You notice on the left there are images with either a J or an R on them. This indicates that the Original shown is either Jpeg or Raw.  Once you decided on which format you want to transfer to Lightroom (and I would recommend the RAW) you need to make sure all the pictures have that format set as the Original as that is what Lightroom will import.
    • So to to set your Originals to the format that you want, select all the photos and then right click on one of the images to bring up the menu and select Use RAW as Original. The menu is shown below, but this will change all the Original displayed images to be RAW format and Lightroom will import the RAW image. It will not import the Jpeg version.Use as Original
    • If you had imported the RAW version and how you would like to import the Jpeg version, it is possible. In this case you would go back into Aperture and set the Jpeg version to be the orginal image this time, then repeat the import process into Lightroom. It will take just as long if not longer that the first import as Lightroom checks each image to see if it is a duplicate. Since the Jpegs are not duplicates they will be added to your Lightroom library.
  4. Afterthepreviewswere generated,IopenedLightroom CC 2015 and started the import process
    • For this test I choose to create a new Lightroom catalog by going to file and choosing New Catalog and picking a location on a hard drive that I knew had enough space.
    • I went down to Plug-in Extras in the file menu to go and choose Import from Aperture Library only to find it grayed out as shown below.Greyed out Plug-in
      • TIP – My work around was to close this catalog and re open it.  Once opened again, the Import from Aperture became available.
    • Now that I’m able to select the Import from Aperture Library, I selected it and then worked through the series of Prompts.
    • On the first dialog box you will need to select which Aperture library you are going to migrate along with the location for where the files will be copied to.Lightroom Import Dialog 1
    • Next, while on this dialog, select the Options button. On the options page, check the box on the line for previews from Aperture to import the previews that were generated in the previous steps.Lightroom import options
    • After clicking ok on the options dialog, you can click import after checking that everything is ok.  Note it does show you how much disk space is required and how much is available on the destination so make sure you have enough space before clicking import
    • You may get prompted to do reverse geocoding. What you do here is up to you, in my case I choose to enable it as I had geotagged all of my New Zealand trip photos to create a map in Aperture
    • During the import you will see your status in the following dialogLightroom Progress
  5. Click done when the process has completed.
  6. You will be presented with the below information as a reminder of what was doneLightroom Import notice


For my Aperture library that had 11966 photos in it it took about 4 hours to complete on my older iMac. During the import it said it was going to import 13301 files which is more than what was in my Aperture library so I needed to investigate.

Here is the view of my Aperture library

Aperture Library Projects
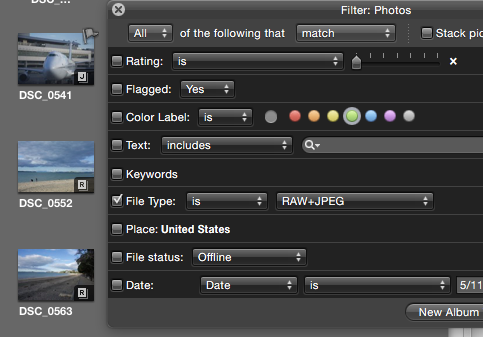
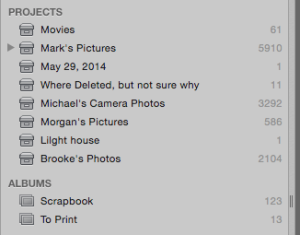
Here is the file view in Lightroom after the import which shows the different dates for the photos.

Lightroom files

After reviewing the list I noticed I had some files from 2013 which were not part of my Aperture library. More on that in a bit.

Here is a view of the Collections in Lightroom

Lightroom Catalog
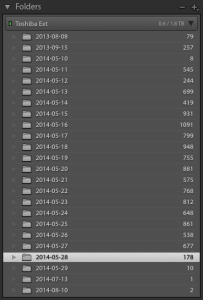
So between the two views I found some oddities with the import. I don’t blame Lightroom on this one, but Aperture. What I found was I had some extra photos added to Lightroom that were not part of my New Zealand Trip Aperture Library. After doing a little digging I determined that they were photos that I had shared via iCloud. Even though I had disconnected the iCloud connection these photos were still imported as part of the import. I suspect this was part of the reason the import took so long as it was downloading these from iCloud as it imported them. I’m not totally sure yet why this happened, but I suspect it has to do with Apertures iLife Browser support.

Next oddity shows up in the Collections. The import did put all of my New Zealand Library projects into a Collection called From Aperture, the Albums are correct, The Projects are correct, but the oddity comes in the Published Project section. Again, even though I had disconnected all my shared services it still showed the list of shared projects that I had shared on my flickr account and on iCloud. There are no pictures listed in each of these projects, just the list of projects themselves except for the 2 projects that I had shared on iCloud.

The projects that were imported show in the collection under their name, but the photos them selves show in a sub-folder of the project name called “Project Pictures” as show above for the two projects “Brooke’s Photos” and “Lighthouse”

Even though the import process imported more pictures that it should have and added extra items in the Collections, overall I’m please with the process. I would rather a process import more that it was suppose to than had it the other way around. I do have one mystery to figure out in that my Aperture library had 11966 photos in it and after removing the extra imported photos from iCloud Lightroom still shows 12390 photos as being imported. Did a little digging and confirmed the count difference is a result of the import process importing another image of any Aperture photos that were modified. In the finder it is easy to find these photos as they have “_Aperture_preview” added to the file name.

I consider these issue minor and the import test a success, but I would recommend keeping your Aperture library backed up someone just in case. Especially if you have RAW+JPEG images.

In summary I would say that I was pleased with the import results and if you plan and prep your Aperture library before doing the import I believe you will also be pleased with the results.

There are many sites our there thankfully and here are a few of the many that I’ve found useful when I was researching how to do the transfer.


Sold a photo of my Alma Mater Milton Hershey School today

Sold one of my favorite photos of my Alma Mater, Milton Hershey School, today

Thank you to the buyer from Wake Forest, NC for your purchase.

I have several other angles of Founders Hall and during daylight hours, but I have come to like this one the best as you can see Founders Hall light up at night like this from all over Hershey.

If I remember right, you could see the top of the Dome from the student homes I use to live in while there and it is one of the buildings that has not changed since I attended school there.


Founders Hall at Night

Ace Rental Auckland Airport, New Zealand Review

First I have to say this one is a little overdue as I thought I had already posted this, but had not. So forgive the lateness.

After extensive online searching for the best price on a rental vehicle on my trip to New Zealand last May, I settled on renting from Ace Rental, Airport branch.

We booked very early in that I booked the People mover (Van for those in the US) back in Oct when our trip wasn’t until the following May and got the best rate out of all the rental agencies I could find for Auckland.

Booking online we easy and convenient. The only confusion I had been when I got the confirmation it showed as “Tourism Enterprises Ltd trading as “Ace Rental Cars””.

When we arrived in Auckland we called the Airport branch from their courtesy phone at the airport and they arrived in their shuttle van with a trailer for our luggage within 10 mins.

At the branch, the staff were friendly and got us squared away with the paperwork rather quickly. We did opt for the full insurance which I think made the paperwork go much quicker.

Now here is where I had the only problems.

After getting the paperwork done, they walked us out to check out the vehicle and walked up to a car, this was not what we had reserved as we had reserved a People mover (Van for those in the US)

I showed them my booking receipt and they apologized and we walked back in while they got the People mover ready.  We went out and checked out the vehicle, put our luggage in and drove off.  This vehicle had a problem right from the start in that at about 50K it had a horrible engine noise and no acceleration and then the check engine light came on.  We immediately took it back and after waiting another 10-15 minutes they got us another People mover for us and we drove off into the city without issues this time.

We were very happy with this vehicle and had no issues with it while on our trip. At the time of our booking, they offered AA (AAA for those in the US) roadside assistance, if you needed it, but we did not, so I cannot speak to that. But most Auto Associations have very good service.

I would recommend getting the full insurance, as many roads outside of the city have loose stone and can easily chip the windshield, which did happened in our case. That and you do not have to deal with the large hold on you card (what they call Excess and Bond)

When we returned the People mover it only took a few minutes to check the vehicle in and the shuttle to take us to the departure terminal was already there, so we when right off to the terminal.

Despite the minor problems, I would still recommend this company due to the value for the service.  The next closest competitor was at least $300 more and that was a similar service to Ace.  If you went with the name brand agencies I would have spent over $1000 more.

Also, these are late-model vehicles with higher mileage than you would find at a name brand agency, but that is how they keep their costs down. Since they are late-model vehicles, the might get lower gas mileage/kilometers that a newer vehicle, but I in our case the gas consumption was about the same as a newer model and thus didn’t justify paying the higher rental fee. The vehicles all seemed well cleaned and in good shape as I checked out several of the cars while we were waiting for People mover to become ready.

I would take a copy of your rental confirmation with you and do one thing that I didn’t, call or email the branch you are renting from the day before just to confirm your reservation. This way they should have the right vehicle ready for you when you arrive.

A People Mover rented from the Auckland Airport Ace Rental
Entrance to Ace Rental on Manu Tapu Drive
Entrance to Ace Rental on Manu Tapu Drive, just a few Kilometers from the Airport.